
You can use the recover feature to retrieve the backup data of one or more protected systems on a vault back to an appliance.
This could become necessary if the customer's original appliance is damaged or lost and you wish to retain your existing snapshot history after replacing that appliance. Or you might also wish to convert a Direct-to-Cloud (D2C) endpoint back to an appliance endpoint.
- This article describes how to use the vault to recover an existing appliance-based protected system, by recovering that data on the vault back to an appliance. If you need instructions for converting an existing Direct-to-Cloud (D2C) endpoint to an appliance endpoint, see Convert from appliance mode to D2C mode
The appliance recovery process, using the vault, includes the following steps:
Before you begin: Ensure the vault and the new appliance have both been upgraded to the latest x360Recover version.
Step 1: Stop and disable the x360Recover agent on protected systems
As a first step, you will need to stop and disable the x360Recover agent on each protected system being protected by the faulty appliance.
1. On the protected system (local machine), launch Windows Services.
2. Find the Replibit Agent Service, right-click the service, and select Stop.
x360Recover backups are now paused.

3. Right-click the Replibit Agent Service and select Properties.
4. In the Startup Type drop-down menu, select Disabled.

5. Click OK to save your settings. The agent service is now disabled.
Step 2a: Replace disks on the faulty appliance (Option A)
If the original appliance is still working but requires new disks, you will need to install replacement disks and create a new storage pool.
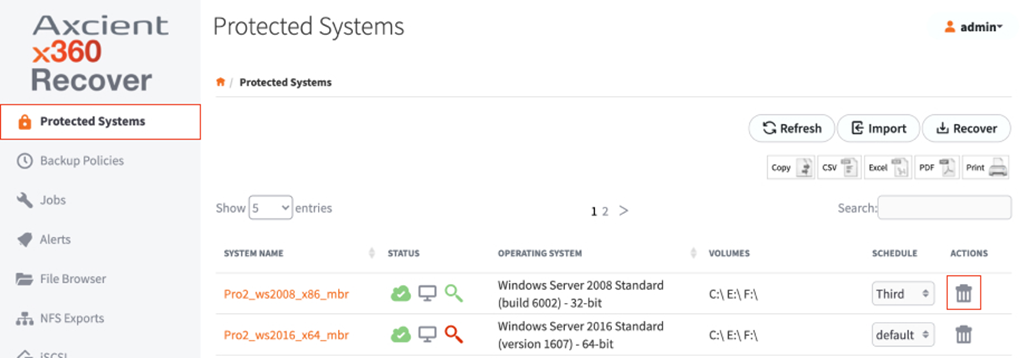
1. Log in to the original appliance web interface and choose the Protected Systems tab on the left hand menu.
2. In the Protected Systems page, select the delete icon associated with the appropriate protected system.
3. To destroy an existing storage pool on your device, please contact Axcient Support for assistance. Enable Remote Assist on the target device and open a ticket requesting that the storage pool be destroyed.
NOTE: The option to destroy the storage pool has been removed from the UI. That option is now an Axcient support-only feature as part of Safety Archive, to ensure that a malicious user cannot easily destroy your backup data.
5. After the storage pool has been deleted, return to the appliance web interface and create a new storage pool. For instructions, see Managing the Storage Pool
Step 2b: Prepare a new appliance (Option B)
Alternatively, if the appliance has completely failed, you will need to provision and configure a new appliance.
NOTE: The new appliance should be configured to have the same IP address as the old appliance. If this is not possible, you will need to edit the aristos.cfg file on each protected system (located within the agent installation folder) and update it with the new IP address:
(Set SERVER=<IP Address>)
1. Install the x360Recover software onto the new appliance and configure appliance settings. For complete instructions, please reference the Install the x360Recover OS
- To deploy a new appliance for the same customer account, create a new location for the customer in the License Portal. When completing the Provisioning wizard for the new appliance, select the customer and the newly created location to deploy to.
- The customer containing the protected systems to be recovered must be active within the License Portal to perform a vault recovery. If the customer account has been deactivated, select the account and click Activate from the toolbar.
- Once you deploy and register a new appliance to a new location, assign the appropriate licenses to the new location. Do not delete the original location within the License Portal until after you have completed recovery for all protected systems.
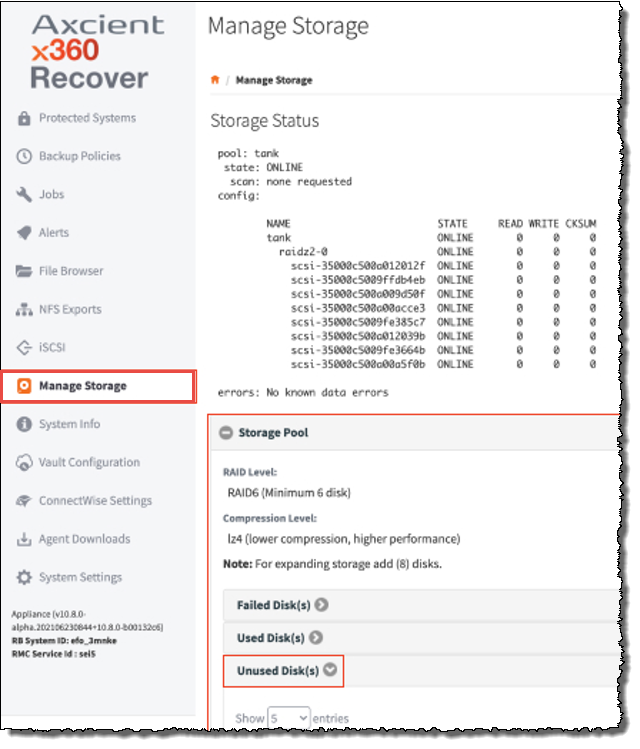
2. On first login to the new appliance, you will be locked on the Manage Storage tab until you create a storage pool.
For instructions on creating a storage pool, please reference Managing the Storage Pool
3. In the left navigation, click the Protected Systems tab.
Make sure the Protected Systems page does not list any protected systems.
Step 3a: Recover over the internet (Option A)
After the faulty appliance is fixed, you can recover protected systems from the vault. You can recover over the internet or using a USB device.
If you are planning to recover over the internet, complete the steps below. These steps apply to both Axcient-hosted and self-hosted vaults.
NOTE: Perform recovery on only one protected system at a time
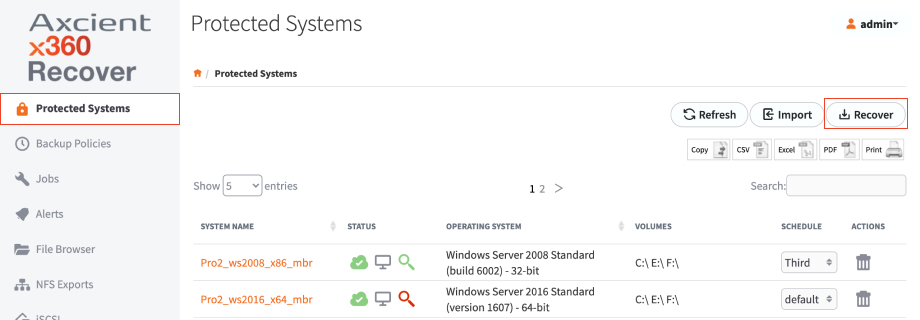
1. Log in to the appliance web interface and select the Protected Systems tab on the left hand navigation.
2. In the Protected Systems page, click the Recover button.
3. In the Recover Protected System pop-up window, enter the Vault IP address or URL (without https). Click the Test Connection button to confirm that the appliance can communicate with the vault.
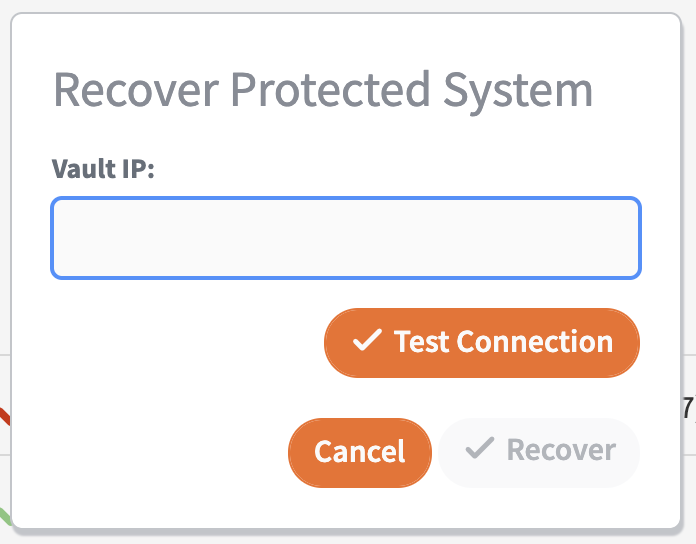
4. When prompted, select the original Customer Location, the appropriate Protected System, and the desired Base Image. (The base image is the oldest snapshot you wish to recover on the appliance.)
5. Click the Recover button when all fields are completed as desired.
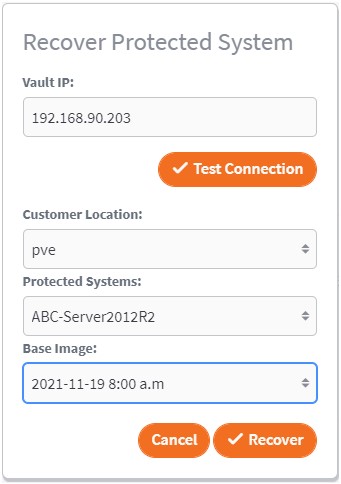
NOTES:
- If no protected systems are listed, ensure (a) that you entered the correct vault URL, (b) that you selected the correct customer account when provisioning the new appliance, and (c) that there are protected systems for the specified client already existing on the vault that are NOT on the appliance yet.
- If the Base Image selection is not available, verify that both the appliance and vault are running version 10.16.0 or higher.
Tip: Keep in mind that if you select a base image newer than the oldest recovery point on the vault, you will recover less data to the appliance. This might be desirable, for instance, if storage space on the appliance is limited.
6. Repeat these steps for each protected system.
NOTE: Perform recovery on only one protected system at a time
Step 3b: Recover from an Axcient-hosted vault using a USB device (Option B)
You can also recover from an Axcient-hosted vault using a USB device.
NOTE: Perform recovery on only one protected system at a time
1. Open a ticket with Axcient Support, requesting a USB Recovery device for your protected systems. You will be billed for this service.
Ensure that you include:
- The full vault URL
- The protected system names
- Shipping instructions
- The base image (snapshot) to be used for recovery. (Include either a specific snapshot date/time or specify the number of snapshots, number of days, etc. that you wish to recover.)
- An encryption password to be used
IMPORTANT: Do not lose this encryption password. We cannot recover this password, and if it is lost, you will need to request a new USB recovery device
2. When you receive the USB device in the mail, attach the USB device to the appliance.
3. Log in to the appliance web interface.
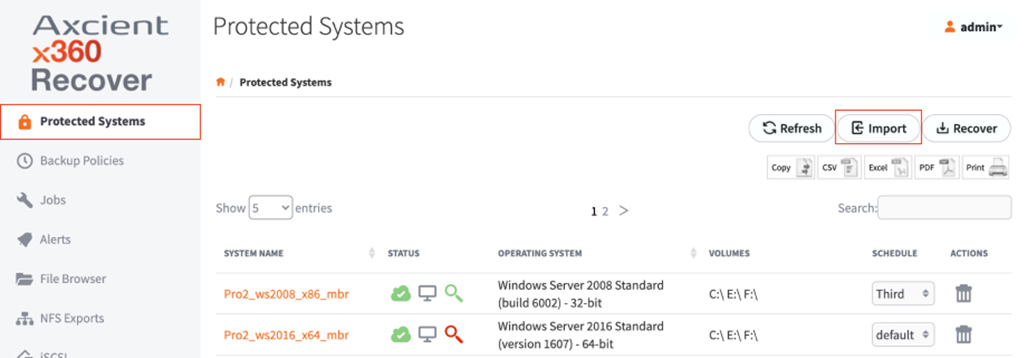
4. In the left-hand navigation menu, click the Protected Systems tab.
5. In the Protected Systems page, click the Import button.
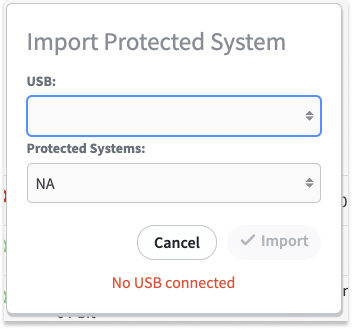
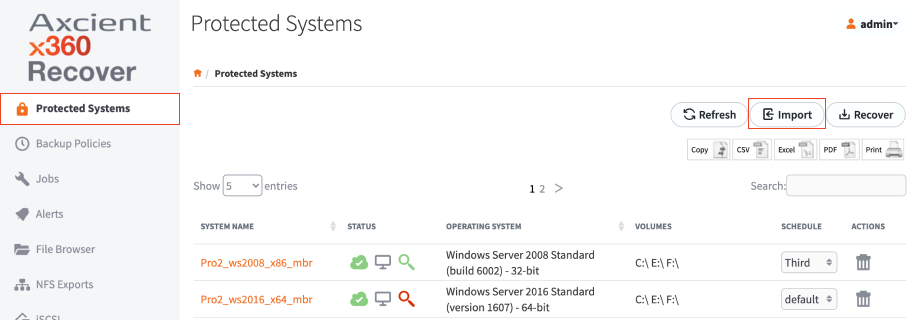 6. In the Import Protected System pop-up window, select the USB device, the Protected System, and the Encryption Password you configured.
7. Click the Import button when you are finished.

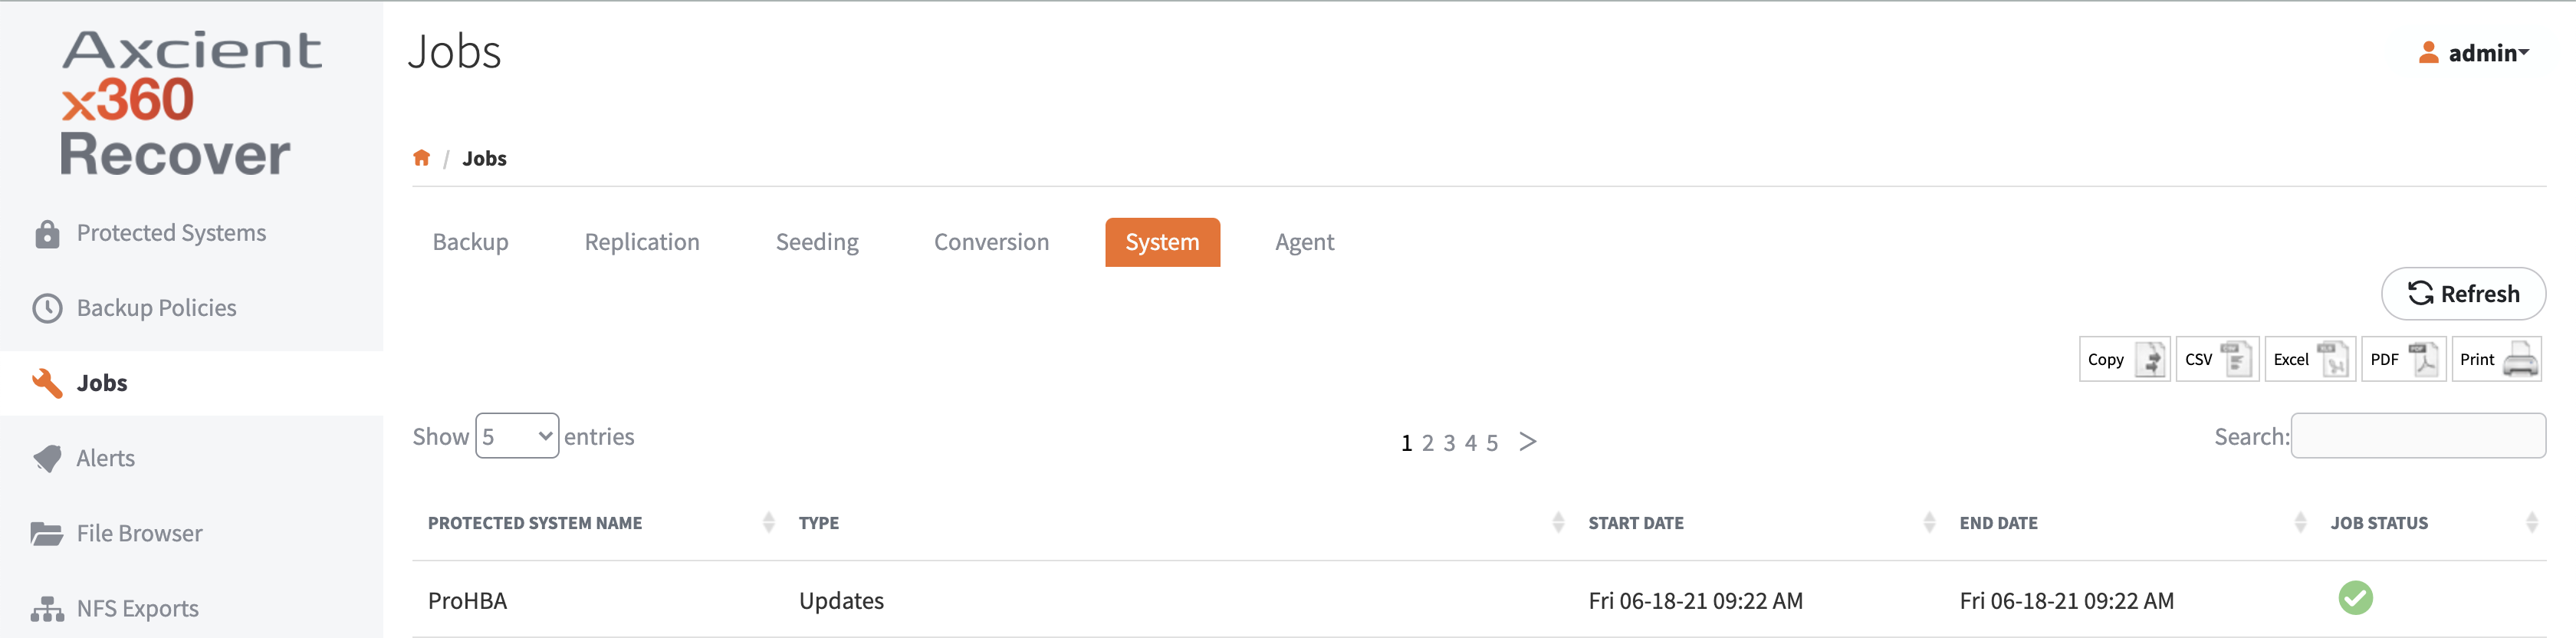
8. To monitor the import process, click the Jobs tab in the left menu and then click the System tab at the top of the page.
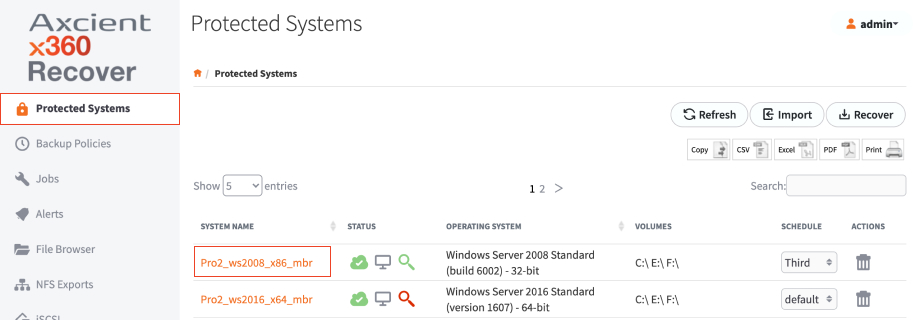
 9. Verify the import process was successful and that the protected system is listed on the Protected Systems page.
10. Repeat these steps for each protected system.
Step 3c: Recover from a self-hosted vault using a USB device (Option C)
You can also recover from a self-hosted vault using a USB device.
NOTE: Perform recovery on only one protected system at a time
1. Attach a USB device to the vault.
2. Log in to the vault web interface.
3. In the left navigation menu, click the Protected System tab.
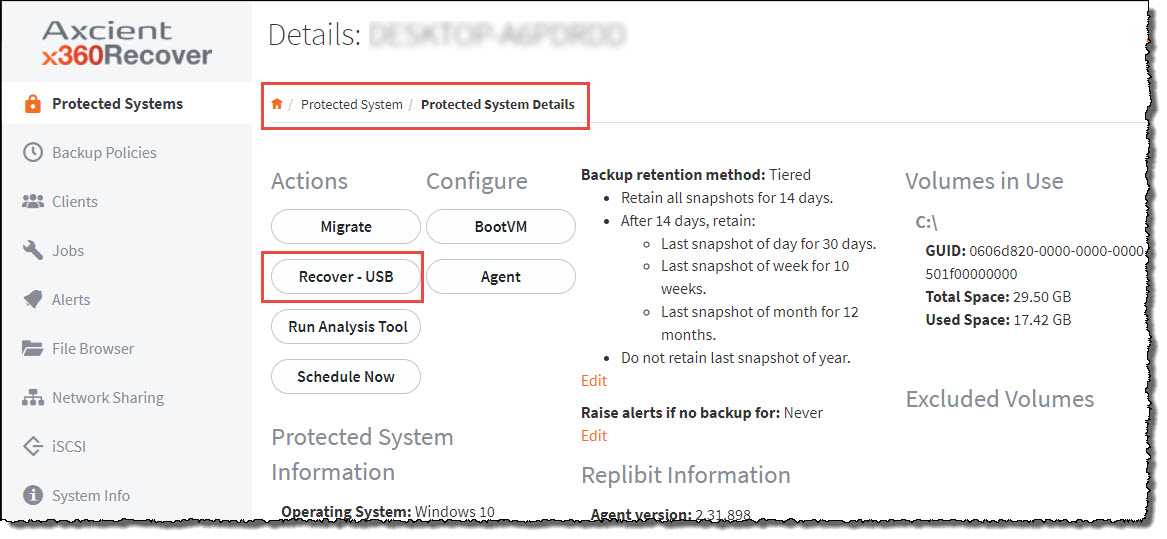
4. Click on the name of the protected system you want to recover.
5. In the Protected System Details page, click the Recover – USB button.
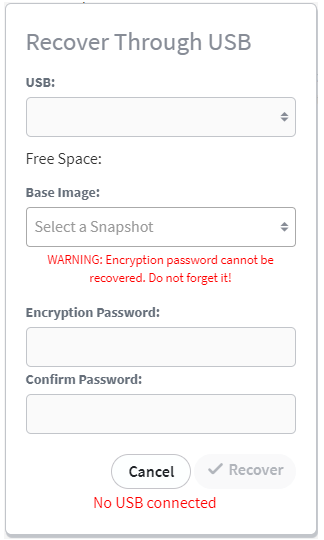
6. In the Recover Through USB pop-up window, select the USB mount point, configure an Encryption Password, and then select the oldest snapshot you wish to recover as the Base Image on the appliance.
WARNING: Do not lose this encryption password. We cannot recover this password, and if it is lost, you will need to request a new USB Recovery device.
7. Click the Recover button when you are finished
 .
.
8. To monitor the import process, click the Jobs tab and then click the System subtab.
9. When the recovery process completes, attach the USB device to the appliance.
10. Log in to the appliance web interface.
11. In the left navigation menu, click the Protected Systems tab.
12. In the Protected Systems page, click the Import button.
13. In the Import Protected System pop-up window, select the USB device, the Protected System, and the Encryption Password when prompted.
14. Click the Import button when you are finished.
15. To monitor the import process, select Jobs in the left navigation and then click the System tab at the top of the page.

16. Verify the import process was successful and that the protected system is listed on the Protected Systems page.
17. Repeat these steps for each protected system.
Step 4. Enable replication from the appliance to the vault
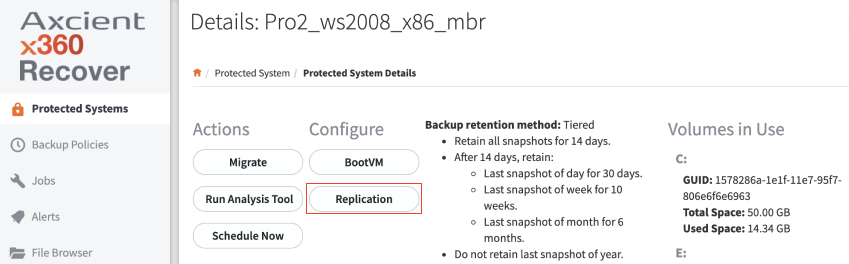
- From the Protected System Details Page select Replication
- Select the original vault (This is the protected system just recovered from this vault.) Note: The vault details should have been imported when the protected system was recovered. If, for some reason, the desired vault is not available in the selection list, navigate to the Vault Settings page and create a vault schedule.
- When creating the replication settings:
- Select the OLDEST available snapshot
- Do NOT use USB seeding. (The data is already on the vault. You only need to link the appliance back to the vault image)
Save and verify that settings were updated
Step 5: Verify backups and reconfigure replication
.After the recovery process is completed, you will need to
- Re-enable the agent services
- Check that new backups are being performed correctly to the appliance
- Verify replication settings
- Delete the original customer location in the License Portal
It may be necessary to manually reconfigure replication for the protected system, back up to the vault, if the original replication settings were unrecoverable.
Perform the following steps:
- Log in to the appliance web interface and verify that all protected systems have registered with the appliance.
- Click the Protected Systems tab and verify that the protected system is listed.
- If the protected systems are not present, check the Jobs -> System tab to verify that recovery operations are completed and were successful
Step 6. Enable and verify backups and replication
1. On each protected system, launch Windows Services.
2. Right-click the Replibit Agent Service and select Properties.
3. In the Startup Type drop-down menu, select Automatic and click OK to save your settings.

4. Find the Replibit Agent Service, right-click the service, and select Start.

5. Verify that backups and replication have resumed:
a.) Click the Jobs tab to verify that a backup is in progress. If you do not see a backup running for each Protected System you may trigger one from the Protected System Details page by clicking Schedule Now.
NOTE: The x360Recover agent may perform a full scan backup of the Protected System. However, only incremental changes will be sent to the appliance.
b). Click the Schedule tab to verify that the schedule has been imported correctly.
c.) Click the Protected System tab in the left navigation and then click the appropriate System Name.
d.) In the Protected System Details page, click the Replication button and verify that replication has been imported correctly.
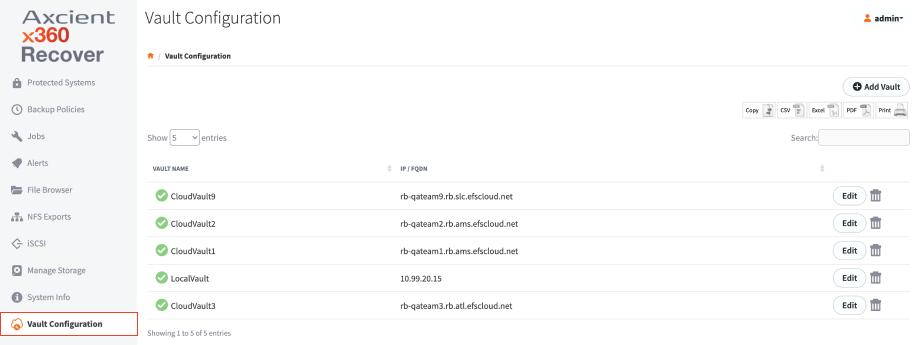
e.) If your replication configuration was not retrieved during recovery, you must create a new one.
Click the Vault Configurations tab on the left navigation to create a vault schedule.
You can then return to the Protected Systems Details page and enable replication to the vault.
Finish up
After the recovery process is complete, the appliance will perform a full backup of the protected system during the next backup cycle.
When the full backup is complete, incremental backups and replication will automatically start as well.
NOTE: The full backup will be de-duped and only changed data will be sent to the appliance and replicated to the vault.
New backups on the appliance should now be replicated to the vault.
SUPPORT | 720-204-4500 | 800-352-0248
- To learn more about any of our Axcient products, sign up for free one-on-one training.
- Please contact your Partner Success Manager or Support if you have specific technical questions.
- Subscribe to the Axcient Status page for a list of status updates and scheduled maintenance.
1074 | 1135 | 1286