
Overview
x360Sync supports Web Distributed Authoring and Versioning (WebDAV), which is an extension of the HTTP protocol. WebDAV is another way for end users to view and edit documents – both personal and through team shares – located in the cloud. Before end users can use WebDAV, private cloud model environments must be configured to support WebDAV connections.
Benefits of using WebDAV include:
- End users do not need to install desktop clients;
- Shared files are not stored locally;
- Folders and files are accessible through the end users’ native explorer (for example, a mapped drive in Windows explorer);
- Authentication through Active Directory login credentials is supported; and
- WebDAV can be enabled for all users of a given organization, or on a user-by-user basis.
Additional Resources
- For information on WebDAV limitations and known issues, please reference the WebDAV limitations and known issues Knowledgebase article.
- For private cloud environments, existing Certificate Authority signed SSL certificates must be modified to allow for WebDAV functionality. For more information, please reference the Configure the x360Sync Server for WebDAV Support Knowledgebase article.
- For more information on how end users can avoid multiple WebDAV Login prompts, please reference the Avoid WebDAV Login Prompts Knowledgebase article.
Instructions
To enable WebDAV through the administrative web portal:
- Within the appropriate organization, click the Accounts tab. The Accounts page displays.
- In the Accounts page, find the appropriate user account, and click the Edit button. The Account Settings page displays.
- In the Account Settings page, click the WebDAV Access checkbox.
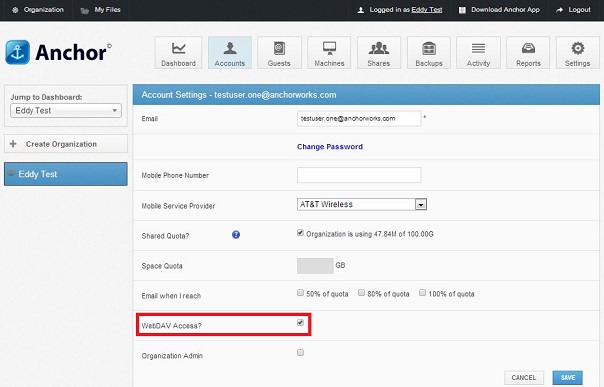
- Click the Save button when you are finished.
Setting Up WebDAV on Windows 10
- From a Windows Explorer window, right-click This PC and select Map Network Drive.

The Map Network Drive dialog box displays.
- In the Map Network Drive dialog box, configure the appropriate drive and folder:
- In the Drive drop-down menu, select your preferred drive letter.
- In the Folder field, enter the URLfor your environment:
- For US SaaS environments, enter https://dav.syncedtool.com
- For European SaaS environments, enter https://dav.syncedtool.eu
- For Candadian SaaS environments, enter https://dav.syncedtool.ca
- For private cloud environments, enter your hostname

- Click the Finish button.
- Enter your username and password when prompted and click the OK button.
Note: If you are logging in with an imported Active Directory credential, use the following format: domain \username.
Your personal folders and team shares will now display. You will be able to access the WebDAV folder in My Network Places.
- To optimize the WebDAV connection, please reference this Microsoft Support article.
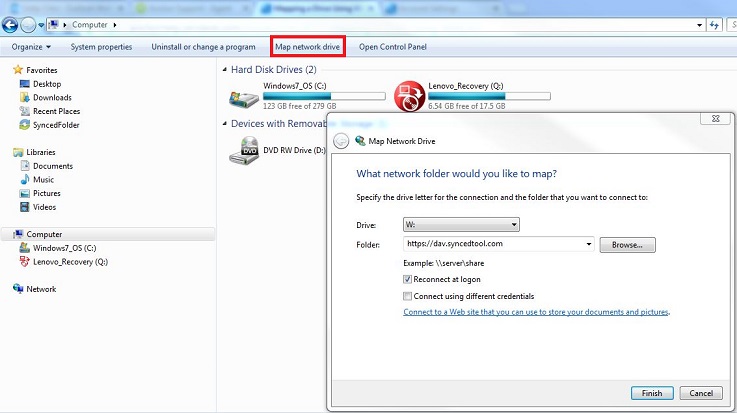
Setting Up WebDAV On Windows 7 workstations:
From your Start menu, click Computer. The Computer dialog box displays.
In the Computer dialog box, click the Map Network Drive button. The Map Network Drive dialog box displays.
- In the Map Network Drive dialog box, configuring the appropriate drive and folder:
- In the Drive drop-down menu, select your preferred drive letter.
- In the Folderfield, enter the URL for your environment:
- For US SaaS environments, enter https://dav.syncedtool.com
- For European SaaS environments, enter https://dav.syncedtool.eu
- For Candadian SaaS environments, enter https://dav.syncedtool.ca
- For private cloud environments, enter your hostname
- When you are finished, click the Finish button.
- Enter your username and password when prompted and click the OK button.
Note: If logging in with an imported Active Directory credential, use the following format: domain \username.
Your personal folders and team shares will now display. You will be able to access the WebDAV folder in My Network Places.
- To optimize the WebDAV connection, please reference this Microsoft Support article.
Setting Up WebDAV On Mac OS Workstations
- In Finder, click the Go menu and select Connect to Server. The Connect to Server window displays.
- In the Connect to Serverwindow, enter the appropriate URL:
- For US SaaS environments, enter https://dav.syncedtool.com
- For European SaaS environments, enter https://dav.syncedtool.eu
- For Candadian SaaS environments, enter https://dav.syncedtool.ca
- For private cloud environments, enter your hostname
- When prompted, enter your username and password. Active Directory users must enter credentials as domain\username.
- When you are finished, click the Connect button.
Last Updated: January 2018