
Learn how to use Axcient's Online Backup Manager (OBM) software to decrypt bare-metal backup images, implement VirtualBoot to virtualize each server and configure the virtual firewall for desired networking and port forwarding.
|
There are two methods available to restore your backup chain to an Axcient Continuity Cloud node. Your choice of methods depends on how you have previously uploaded your backups:
|
When you use Axcient's Online Backup File Manager to decrypt your backed up ShadowProtect data, communication will happen across Axcient's internal data center network. This means you will enjoy much faster transfer speeds than if you were restoring over the Internet.
Step 1. Launch the Online Backup File Manager using the icon on the desktop.

Step 2. Login using the Online Backup File Manager User Name and Password associated with the BDR to be restored. If you have multiple BDRs to restore, repeat this section of instructions for each BDR. Click Next to continue.

Step 3. Click Restore Data:
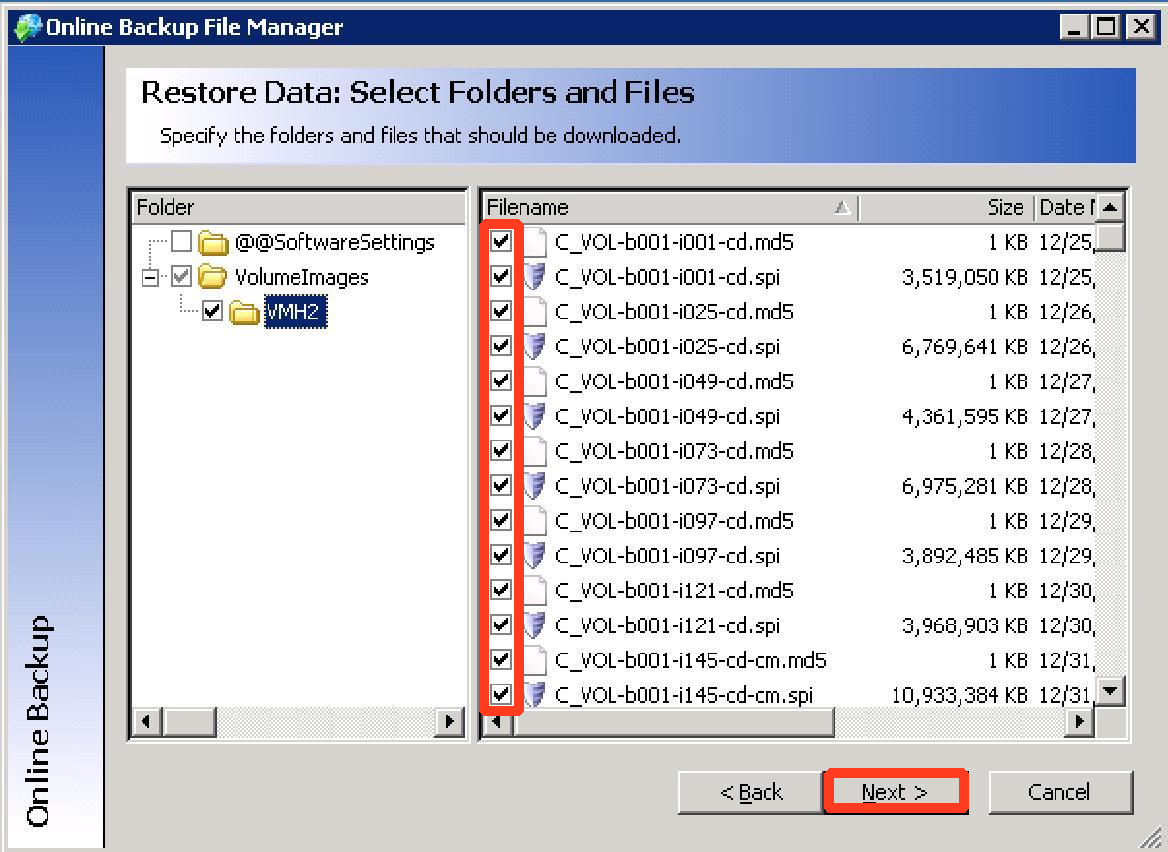
Step 4. Check the boxes of all servers which contain data to be restored and then click Next to continue:
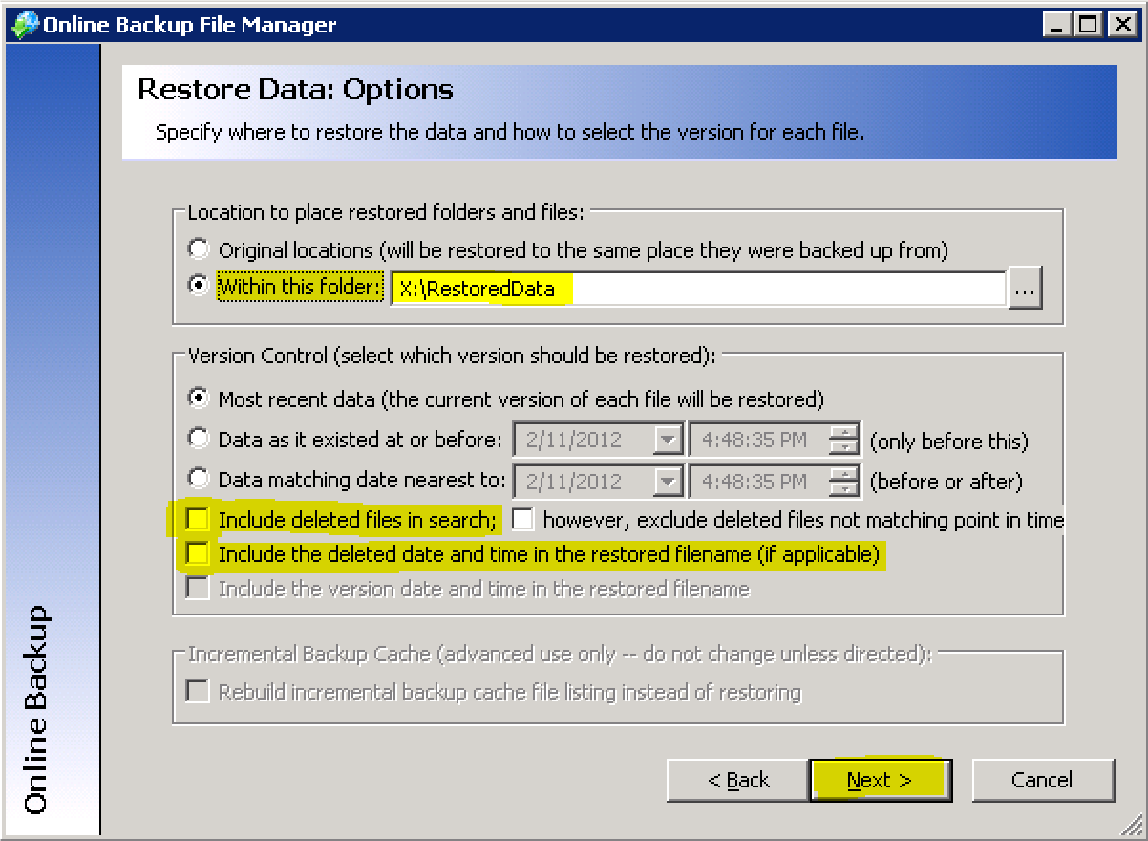
Step 5. When the Restore Data: Options window appears, configure the following settings:
- Adjust all data so it is located within the folder named X:\RestoredData
- Uncheck the box Include deleted files in search.
- Uncheck the box Include the deleted date and time in the restored filename.
- Click Next to continue.
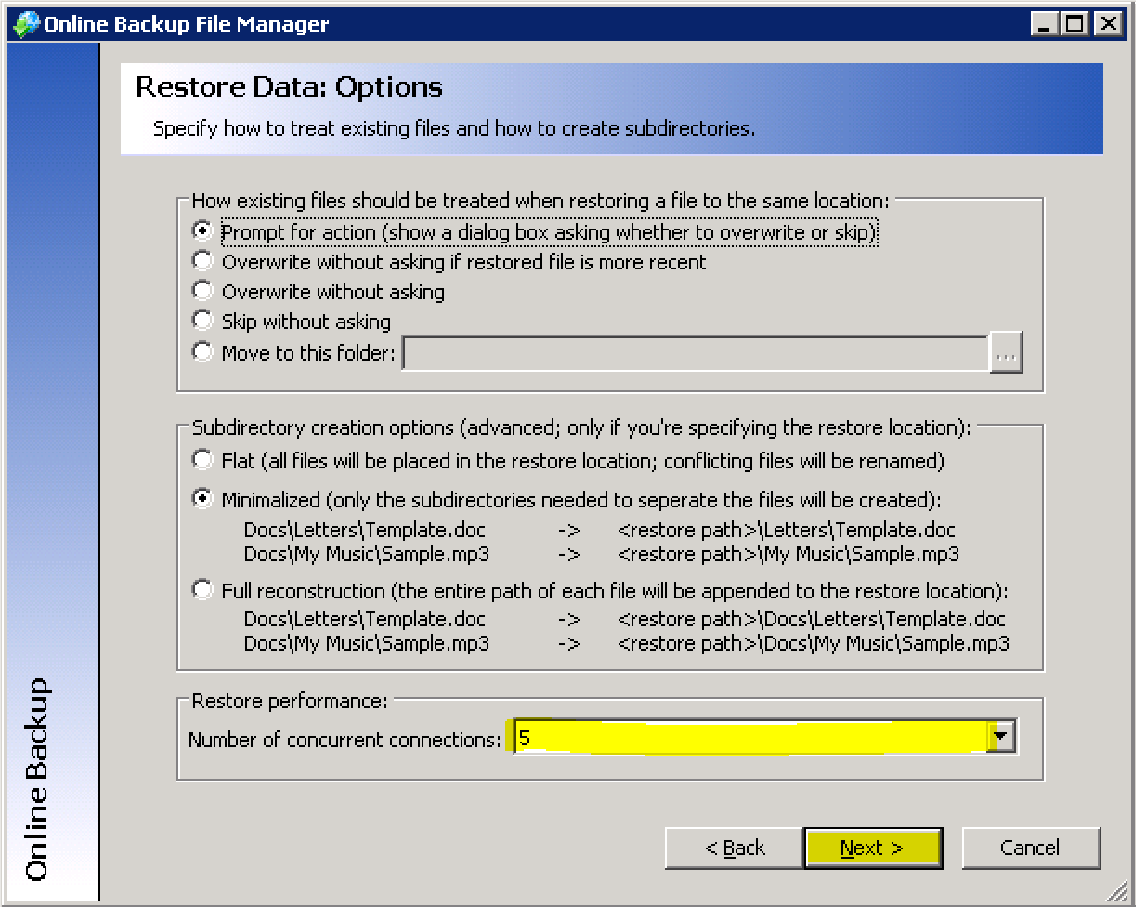
Step 6. Change the Number of concurrent connections to 5 and click Next to continue:
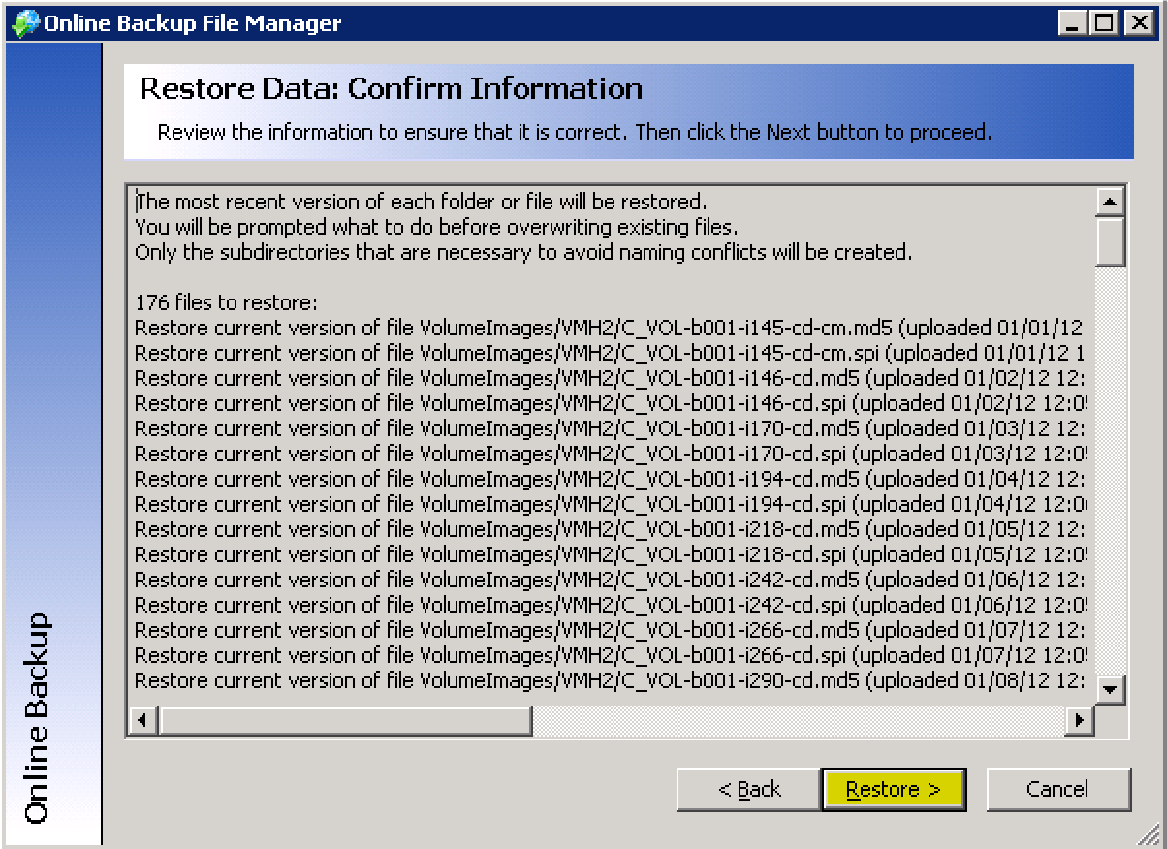
Step 7. The list of files to be restored will be built as you wait.
To start the restore (decrypt) process, click Restore.
Step 8. You should be prompted to enter your encryption Pass Phrase immediately .
Enter the correct encryption pass phrase for this account, and click OK.
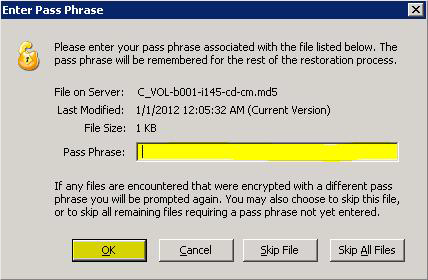
Note: If you do not know your encryption passphrase, you will need to use the tools provided in Axcient's Online Backup File Manager to initiate the pass phrase recovery. (The pass phrase recovery tools are available only if you previously chose to allow pass phrase recovery when you setup this Online Backup File Manager account.)
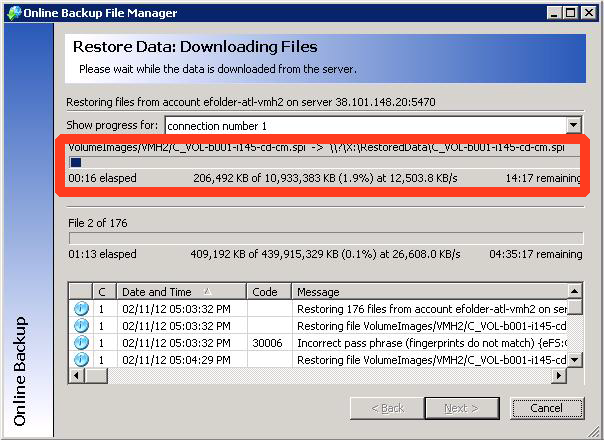
Step 9. Wait while the data is decrypted. You can follow the progress in the display:
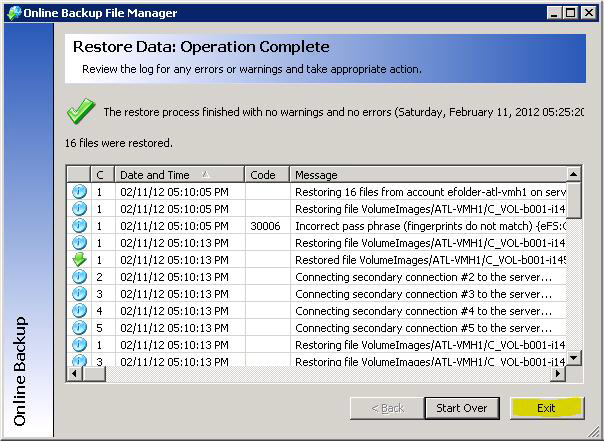
Step 10. When the data encryption is complete, click Exit to close the Online Backup File Manager:
Starting the Virtual Firewall
To start the virtual firewall, on the desktop click the VirtualBox icon:

Highlight the Virtual Firewall VM and click Start:

The virtual firewall will take about 60 seconds to boot. When it’s booted, you should see a menu similar to the example below. Close the VirtualBox Manager GUI, but do not close the window for the Virtual Firewall VM itself:

VERY IMPORTANT: You must stay logged into Windows for the Virtual Firewall (and any other VirtualBox VMs) to continue to run. Do not log out when you are finished with your remote desktop session, but rather disconnect from the remote desktop session instead. This will allow the VMs to continue to run.
Manage the Virtual Firewall
Now that the Virtual Firewall VM is running, click the icon on the desktop to access the management interface.

For help with this step, please see the Continuity Cloud Virtual Firewall Guide.
Once the virtual LAN network settings and firewall policies are configured, resume the next step.
Visualize Restored Servers
Once your ShadowProtect data has been fully decrypted, it is ready for near-instant virtualization.
To do this, use the StorageCraft VirtualBoot feature to create a VM for each server you want to virtualize. First, click the VirtualBoot desktop icon to start the program:

Click Next to begin:

Click Add Image File.

Browse to the X:\RestoredData\VolumeImages\ServerName folder and select the incremental file that corresponds to the operating system volume for the desired point in time you want to virtualize:

Once you click the Open button, any dependent volumes should be automatically add
Make sure that no drive is listed more than once. Click Next.

Specify the operating system, uncheck the Automatically start the new virtual machine option, choose how much RAM is to be allocated to the new VM, and specify that you do not want a network adapter. Then, click Next.

A summary will appear:

Finally, click Finish. The new VM will be prepared for booting. This should only take a minute

Once it’s finished, you should see a success message:

After you have gone through the VirtualBoot process for all servers that you want to virtualize, start VirtualBox by clicking the icon:

Select each server and choose Settings:

Go to the Network settings, and click Enable Network Adapter for the first adapter.
To enable the VM to talk to the Virtual Firewall, choose Bridged Adapter and select Internal-LAN. Then click OK.

Note: If you want to completely isolate the VM (including isolating the VM from the virtual firewall), choose Internal Network and attach it to the intnet internal network:

To start the VMs, select each VM and choose Start.

Once the VMs have booted, you may want to install the guest additions for improved performance.
In the VM’s window, on the Devices menu, choose Install Guest Additions:

Inside the VM login, go to the CDROM drive and run the setup:

When asked to confirm the installation of device drivers, check Always trust software from Oracle:

Finally, reset the IP address of the server. Open Network Connections, find Intel Pro/1000 MT Desktop Adapter connection, right click it and choose Properties.

Then setup an IP address as you normally would.
You may need to reboot for all changes to take effect.
Very Important! If you are virtualizing an SBS server or domain controller, the first time the server boots, when the Windows boot menu appears, immediately press F8 and choose Active Directory Restore Mode or Directory Services Restore Mode. Once the server comes up, login as the local Administrator (.\Administrator) using the Directory Services Restore Mode password, edit the settings for the network adapter to reset the static IP and the DNS server address. For SBS servers, the DNS server address will be the same as the static IP (or 127.0.0.1).
At this point your servers should be running and accessible to users through forwarded ports or any VPN you’ve setup.
Very Important! You must stay logged into Windows for the Virtual Firewall and any other VirtualBox VMs to continue to run. Do not log out when you are finished with your remote desktop session, but rather disconnect from the remote desktop session instead. This will allow the VMs to continue to run.
Clean Up
When you have finished with the Axcient Continuity Cloud, the best practice is to delete any of your data on the X: (using windows explorer), and then securely erase all of the free space on the drive.
To do this, you can open a command prompt and run the command “sdelete -c X:” .
This will securely erase any files you have deleted.
To ensure that you are no longer billed for the Axcient Continuity Cloud service, you must update or submit a ticket indicating that you are finished with the node(s) that have been provisioned for you.
Please note that once you have submitted a ticket indicating you are finished with the node, you will no longer have access to the machine and Axcient will wipe and reimage the machine from bare metal.
Please make sure you have any needed data before submitting a ticket indicating that you are finished with the nodes.