
Using the Rapid Recovery cloud, you can replicate data to the Enterprise Storage Cloud, effortlessly scaling from terabytes to petabytes. In addition to high performing Rapid Recovery Core servers, you also have access to the Continuity Cloud, providing fast off-site virtualization of your replicated servers and networks.
Important: This document applies only to Rapid Recovery (Formerly AppAssure) v6.x.
Contents
To apply this encryption key to an existing agent
To apply this encryption key to a new agent during initial protection
Replication Setup Instructions
Centralized Monitoring: Integration with the Web Portal
To access detailed Core information
Setting Up Virtual Standby Jobs
To set up virtual standby jobs on the TARGET SIDE ONLY
Increasing Your Available Off-site Storage
Solution Overview

|
Important: This document applies only to Rapid Recovery (Formerly AppAssure) v6.x If you are using AppAssure v5.3.X or v5.4.X, please refer to the companion documents AppAssure v5.3.X and AppAssure v5.4.X |
Using the Rapid Recovery cloud, you can replicate data to the Enterprise Storage Cloud, effortlessly scaling from terabytes to petabytes. In addition to high performing Rapid Recovery Core servers, you also have access to the Continuity Cloud, providing fast off-site virtualization of your replicated servers and networks.
Definitions:
- Each local Core that replicates data to the cloud is called a Source Core.
- A hosted Core running in the Rapid Recovery cloud is called the Target Core.
Enabling Encryption
Important: Before setting up replication, please ensure that encryption is enabled on all agent recovery-point chains. We will not accept any unencrypted seed data.
Adding an Encryption Key:
- Navigate to the Rapid Recover source Core, and click the MORE button.
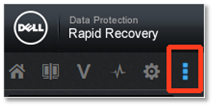
- Select Encryption Keys and then click Add encryption key.
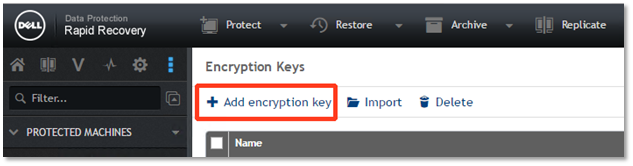
- The Create Encryption Key dialog box appears.
- In the Name field, enter a name for the encryption key.
- In the Description field, enter a comment for the encryption key.
- In the Passphrase field, enter a passphrase.
- In the Confirm Passphrase field, re-enter the passphrase.
- Click OK.
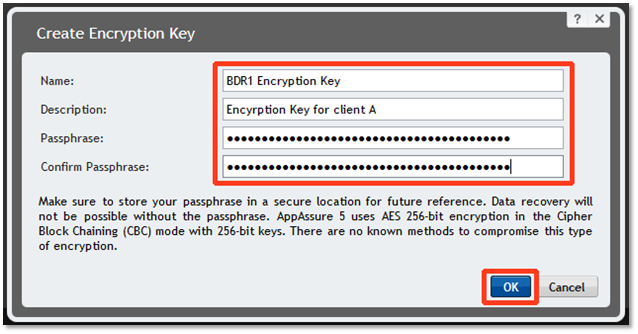
Note: Rapid Recovery 6 uses AES 256-bit encryption in the Cipher Block Chaining (CBC) mode with 256-bit keys. Using encryption is required for replication of data to Axcient Store the passphrase in a secure location, as it is critical for data recovery.
Without a passphrase, data recovery is NOT possible.
To apply this encryption key to an existing agent
- Choose the agent to be encrypted from the left pane of the console in the Protected Machines
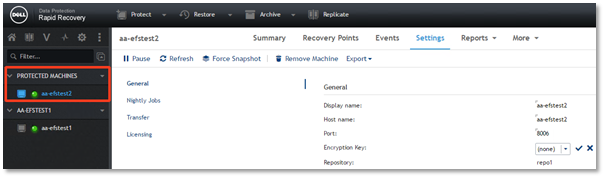
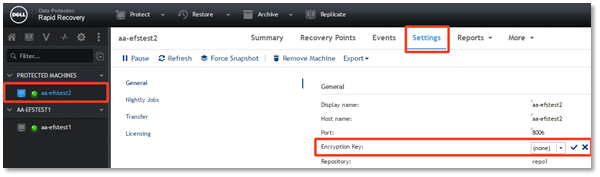
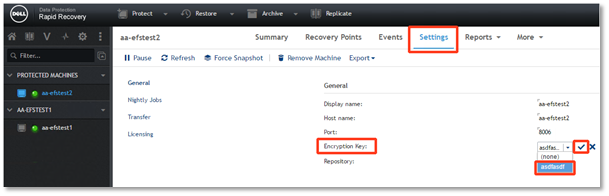
- Click the SETTINGS tab for the selected agent, then click the Encryption Key panel.
- Use the down arrow to select the Encryption Key you created.
- After clicking on the key you created, click the check mark next to it.
Note: Only the subsequent snapshots (and Recovery Points) will be encrypted; earlier snapshots will remain unencrypted.
Note: After you apply the encryption key, the next snapshot will be a base image, which will be encrypted.
To apply this encryption key to a new agent during initial protection
- From the Home screen, select the Protect dropdown tab and click Protect Machine.
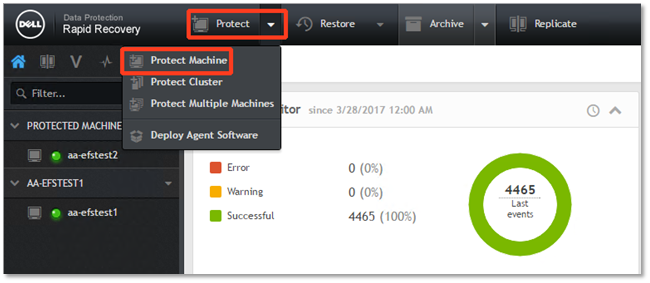
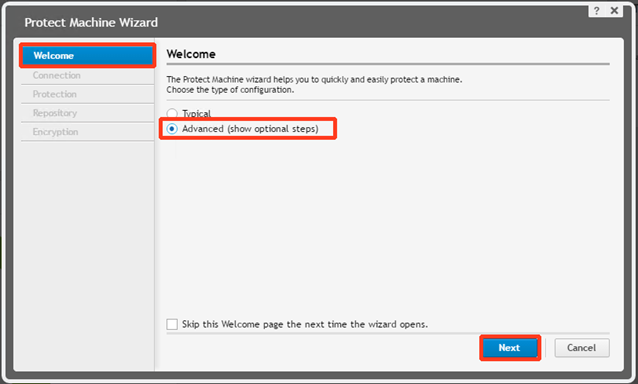
The Protect Machine Wizard dialog box appears.
- Under the Welcome tab, click the Advanced radio button and then click Next.
- Under the Connectiontab, enter the following settings:
- Host
- Port: Leave the default port at 8006.
- User Name
- Password for the machine you want to protect.
Click Next to continue. 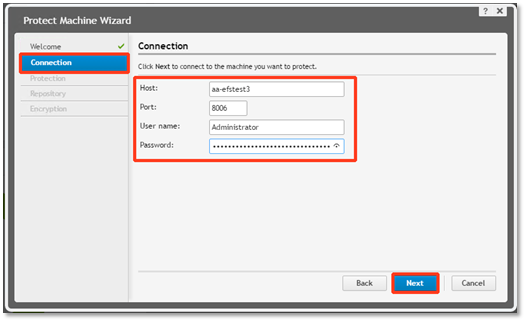
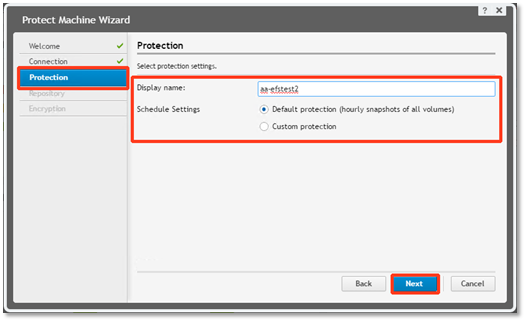
- Under the Protection tab, enter the Display Name for the agent and select the desired option for the Schedule Settings. Then click Next to continue.
- Under the Repository tab, you have two choices:
- Use an existing repository
- Create a (new) repository
Note: To achieve global deduplication, store all agents under a single repository.
Then click Next to continue.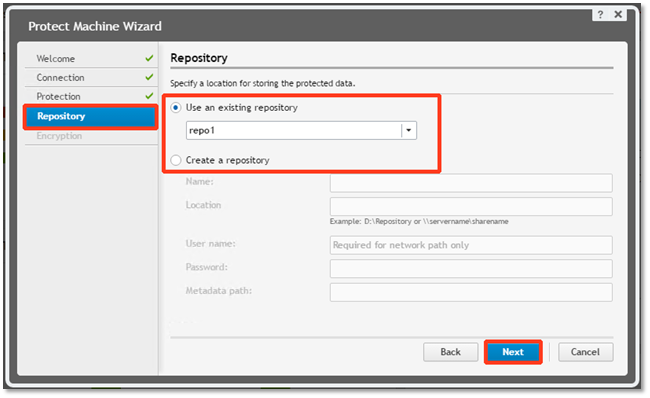
- Under the Encryption tab, check the Enable Encryption checkbox:
- Select Encrypt data using Core-based encryption with an existing key.
- Click the key you recently created.
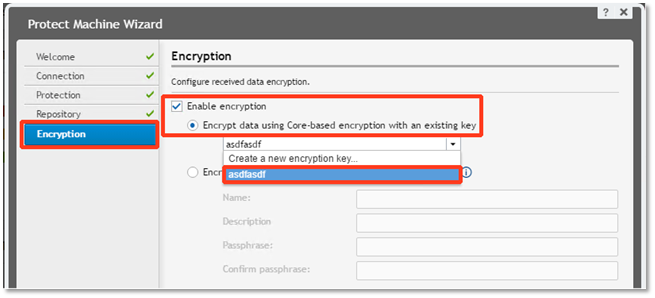
- Alternatively, you can choose to create a new encryption key using the Create a new encryption key field.

Click Finish to complete the Protect Machine Wizard.
Replication Setup Instructions
- For each source Core, make sure that the target Core is running a compatible version of Rapid Recovery. In v6, the source and target Cores MUST match in versions.
- Download our recommended version of the Rapid Recovery software from the Knowledgebase by clicking Dell Rapid Recovery v6 (Formerly AppAssure).
Note: If the source Core is running a version of Rapid Recovery newer than the target Core, please contact Support and we will upgrade your target Core to a newer version.
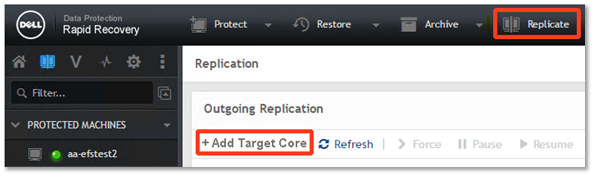
- Next, configure replication on each source Core. To do this, log in to the source Core’s administrative console and click the Replicate tab on the top navigation.
- After the Replication tab has loaded, click on Add Target Core.
Using the Replication Wizard
- The Replication Wizard appears.
When your hosted target Core was provisioned for you, you should have received an assigned Host Name, User Name and Password. You will now enter that information.
Under the Target Core tab, select I have my own Target Core.
- Enter the Host Name assigned to you.
- Enter your assigned User Name.
- Enter your assigned Password.
Click Next to continue.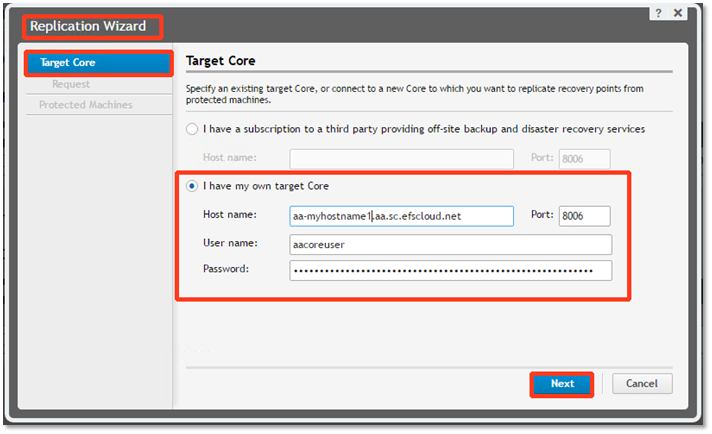
In the example shown, the Host Name is aa-myhostname1.aa.sc.efscloud.net.
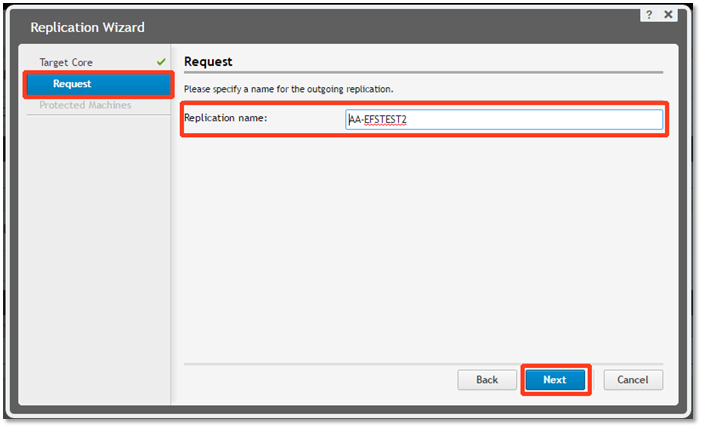
- You can specify a new name for the outgoing replication. (This is useful when the default name is not sufficient for identifying your source Core.)
To do this, under the Request tab, enter the new Replication name for your source Core. Then click Next to continue.
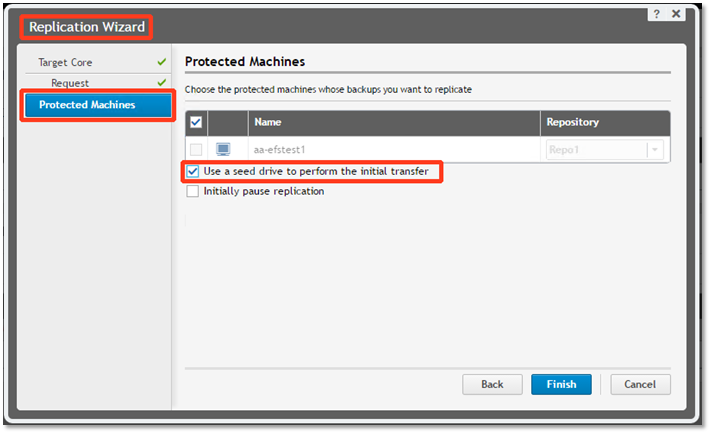
- Under the Protected Machines tab, check the box next to each agent you want to replicate to the target Core.
Then click Finish to complete the Replication Wizard.
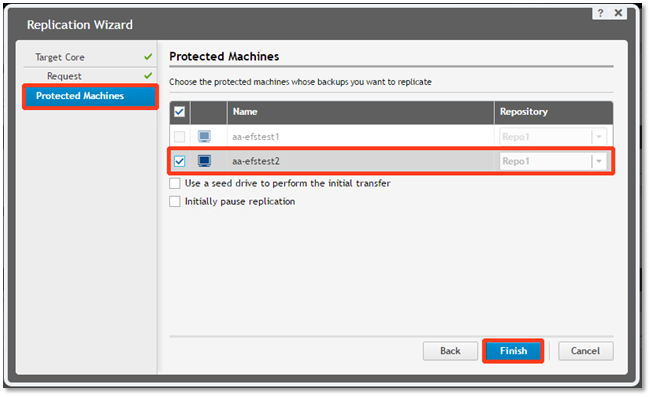
 Important: If you want to ship a local hard disk with the initial set of data, check the Use a seed drive to perform initial transfer checkbox.
Review the information on the following pages to learn about preparing a seed drive.
Only seed drives provided by Axcient will be accepted. All other drives will be rejected.
Seed (“Preload”) Drives
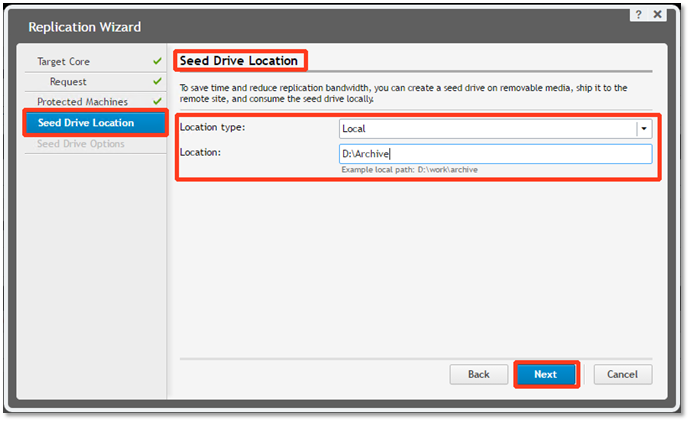
- If you chose to use a seed (preload) drive for the initial data, open the Seed Drive Location dialog box in the Replication Wizard, under the Protected Machines tab.
Note: There is no need to “Initially pause replication”. When a seed process is active, the agent will already be paused and not replicate any data until the process has been completed. Once done, the agent will resume on its own.
- Under the Seed Drive Location tab, select either Local or Network from the drop-down menu.
- Enter the location path.
- Note: If you selected Network as the location type, provide the UNC path and credentials to access the location.
- Enter the location path.
Then click Next to continue.
The Seed Drive Options window will appear.
- You do not need to modify anything on this screen.
- The defaults are correct as shown in the example below:
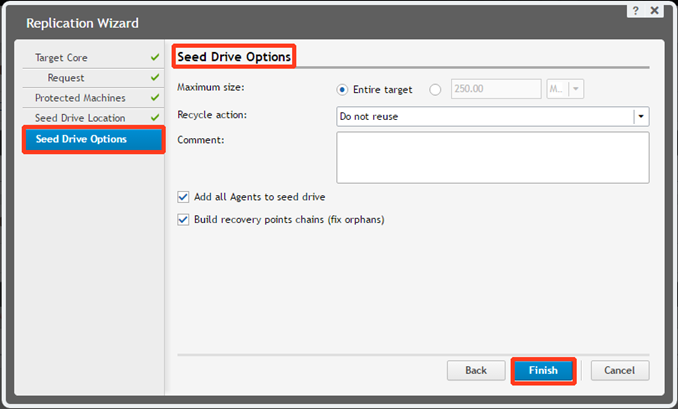
Click Finish to complete the Replication Wizard.
Note: You can monitor the status of the copy (export) operation on the Events tab in the console. Also, please be sure to follow all of the directions listed here when performing a seed operation preload.
Replication Settings
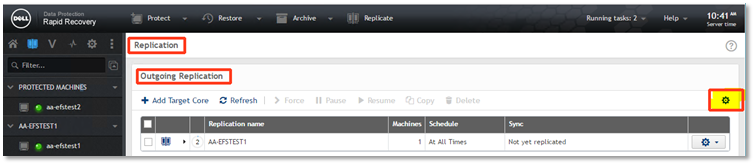
When the replication relationship has been established, the information on the Replication tab should be similar to this:
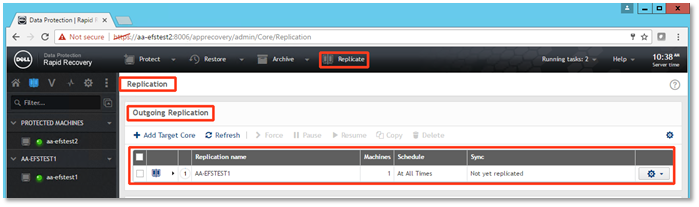
Note: Replication of the base image (or incrementals, if you are doing a seed) will begin for each agent after their next recovery point is received into the source Core.
Note: Replication will proceed in parallel for many agents at the same time.
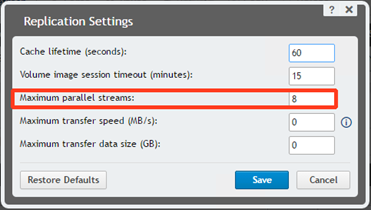
The default level of concurrency is normally suitable for most customers. However, you can customize the settings under the Replication tab, by clicking Outgoing Replication, then clicking the sprocket icon on the far right:
Set the Max. parallel streams to a value that can be handled by the network.
Note: Each replication task will now open this number of TCP streams.
- If the number of TCP streams is set too high, it can cause timeouts.
- If the number of TCP streams is set too low, then replication is slower than what it could be.
|
Rule of thumb: For every 1.5Mb of upload speed, increase Max Parallel Streams by one. • 1.5 Mbps Upload: 1 Max Parallel Streams • 3.0 Mbps Upload: 2 to 3 Max Parallel Streams |
- Maximum transfer speed is set to 0 by default. This means all available bandwidth will be used to upload data to your target core. If you wish to cap this amount, set Maximum transfer speed to your desired value.
Since this setting is in MB (Megabyte) and not Mb (Megabit – Internet speed), you will need to do some math when converting down. 8 Mbit/s = 1 MB. You can use this link when doing the conversion. https://www.gbmb.org/mbps-to-mbs.
- Maximum transfer size can be left at the default of 0.
Centralized Monitoring: Integration with the Web Portal
You can optionally use features that integrate data from your source Rapid Recovery core into the Web Portal. This allows you to:
- Centrally monitor the status of all of your Cores from one cloud-based web portal.
- Set up global alerting rules that generate emails or PSA tickets on warning or error conditions.
- Set up automated billing integration with supported PSA systems (coming soon).
We highly recommend utilizing the Web Portal integration functionality.
To use this functionality, you will first need a partner account created for you in the Web Portal. After you have gained access to the Web Portal, follow these instructions for each source Core:
- Use the Web Portal to create a new account with the AppAssure Core service plan.
- On the source Core server, download and install the Backup Manager client program. Note that you must use version 3.19.57 or later of the Backup Manager client.
- In the Backup Manager, on the My Account page, configure the Web Portal account User Name and Password credentials and then click Save.
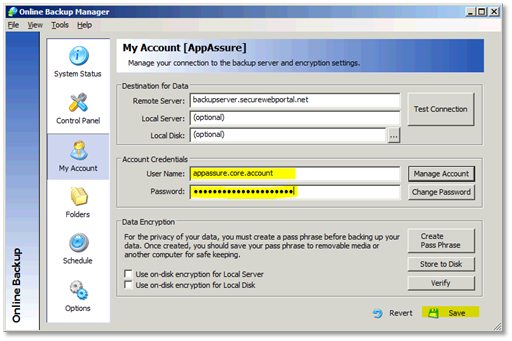
Note: You do not need to create an encryption pass phrase unless you also plan to use the actual file-level backup features of the account (instead of just the AppAssure Core integration features.)
- Configure the settings on the Schedule page to back up 24 times per day:
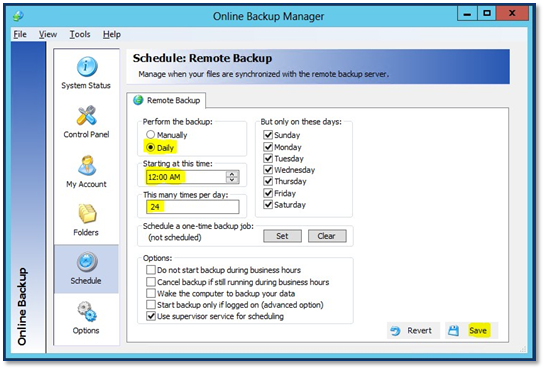
This will cause the Core information to be updated every hour in the Web Portal.
We do not recommend or support updating information more frequently than every hour.
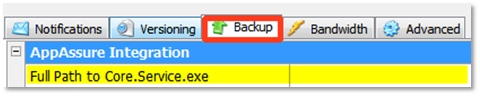
- If you have installed the Rapid Recovery v6 Core in the default location, no further configuration is required.
- If you have not installed the Rapid Recovery v6 Core in the default location, you must use the Backup tab on the Options page to configure the location of the Core program.
After you have finished configuring the integration, the AppAssure/Rapid Recovery Core information in the Web Portal will refresh every hour. The status of each Core and each agent on each Core will appear on the Dash Panel report, allowing you to easily see the last snapshot date or completed replication date for each agent and the status of all backups, replication services, virtual standby services, and repository state and disk usage information.
Note: If you prefer, Axcient technical support can set up the Web Portal integration for your target Core (if we have not already done so). Simply submit a ticket with your Web Portal username and the hostname of your target Core, and we will take care of it for you.
To access detailed Core information:
Additional detailed information is available in the Web Portal about each individual Core. There are several ways you can view repository status, backup status, replication status, the progress of any snapshots, replication jobs, seeds, consumes, or virtual standby jobs, as well as detailed event log history.
Method #1: Log into the Backup Portal page here: https://backup.securewebportal.net.
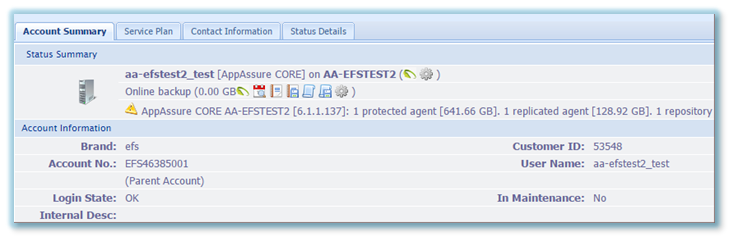
After login, click Accounts, then Account Center (Visual View). Right click on the account and click Show/Hide Details. At the bottom, you will see this display:
Method#2: Alternatively, on the Account List page, click the AppAssure icon in the last backup column field for the account associated with your target Core.
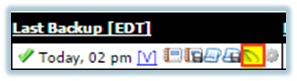
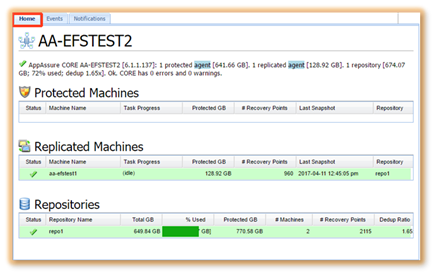
The detailed Core dialog appears:
|
The Home tab displays the status of protected and replicated machines and repositories. |
|
|
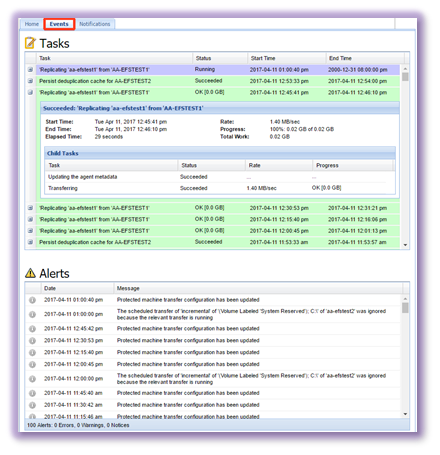
The Events tab displays detailed status of backups, replication, or virtual standby jobs, plus the progress of active jobs.
The Notifications tab shows a history of the status state changes of this Core server.
For example, when error alerts and error resolution alerts were sent, and which of your notification rules were triggered.
|
|
Managing Your Off-Site Core
- You can manage and monitor the state of your target Core running in the AppAssure Cloud by pointing your web browser to
https://aa5- myhostname.aa.sc.efscloud.net:8006/apprecovery/admin/Core
(where aa5-myhostname is the name of your Core). - You can also add your target Core to the AppAssure multi-Core management console software and manage it centrally with your other Cores. Keep in mind the CMC (Central Management Server) software must match the currently installed version of your core.
Setting Up Virtual Standby Jobs
Virtual standby jobs allow you to keep updated Hyper-V or VMware virtual machines (VMs) that represent the latest version of your protected servers. These VMs are thus ready to be started quickly in case the original protected server is no longer available.
Note: Virtual standby is only available for protected Windows servers at this time (version 5.4.3.106 or newer of AppAssure). All versions prior to v5.4.3.106 have been discontinued and are no longer supported.
- If you are using a BDR appliance locally, we recommend setting up virtual standby jobs on the source Core so the BDR can nearly instantly virtualize your protected servers locally.
- If you are using a dedicated Continuity Cloud node, you can also set up virtual standby jobs on your hosted target Core. This allows any protected servers to also be virtualized in the cloud nearly instantly.
- If you are not using a dedicated Continuity Cloud node, you will only set up virtual standby jobs when you have a need to virtualize a server in the cloud, after you have been assigned your on-demand Continuity Cloud node(s).
Virtual standby VMs are updated after each recovery point is received by a Core and thus are kept continuously up to date. Updates to VMs only need to apply the data blocks changed within the received incremental recovery point; thus, updates to VMs usually complete within a few seconds or minutes. The time required for the initial export depends on the amount of data and other factors and might take several hours.
To set up virtual standby jobs on the TARGET SIDE ONLY:
- Log in to the source or target Core Admin Console and navigate to the Virtual Standby Then click Add.
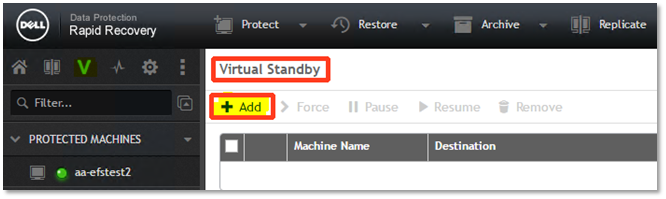
The Virtual Machine Export Wizard dialog appears.
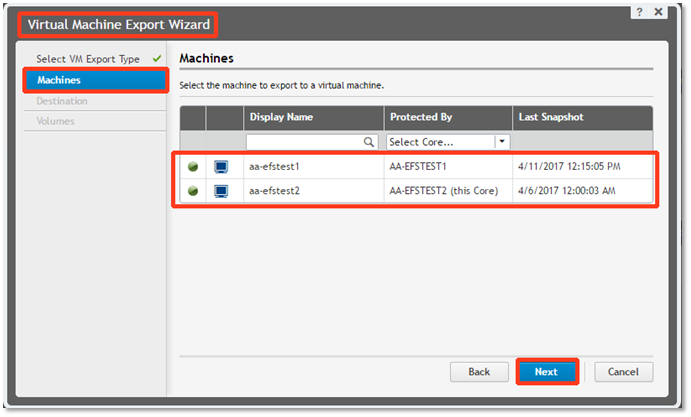
- Under the Machines tab, select the desired agent(s) and then click Next.
- Under the Destination tab, select the target host virtual machine type you want to export the agent to.
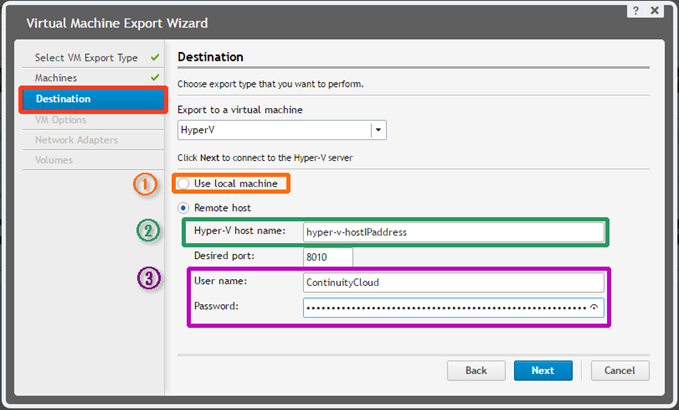
- Note 1: When configuring the Hyper-V export (for Hyper-V-powered BDR appliances), click Use local machine.
- Note 2: When configuring for the Continuity Cloud: in Hyper-V Host Name, enter the AppAssure private IP listed in the Private- txt file on the desktop of your Continuity Cloud node.
- Note 3: In the User name and Password fields, enter the credentials you were assigned for the Continuity Cloud node.
Then click Next to continue.
- Under the VM Options tab:
- Specify the VM Location: Choose a path that is local to the Hyper-V server (X:\Share). On Continuity Cloud nodes and BDR appliances, choose a directory on the “X” volume such as X:\Share.
- Enter the VM Name. Please type in the name of the agent. Spaces are not allowed.
- Choose the amount of RAM to use. (RAM should be set to the size in RAM multiplied by 1024. For instance, if you need 8 GB of RAM, set RAM value to 8 x 1024 = 8192.)
Note: If you leave the RAM set to “Same as source machine”, it will reserve what you have in use on the production machine. If that value is higher than what you have free, the VM will not start (due to lack of RAM) and will need to be changed (in the settings of the VM in question).
- Generation: If you are unaware of which boot partition you have, leave the default setting of Generation 1. Generation 2 is reserved for agents that have an UEFI/EFI boot partition.
- Let the software choose disk format. VHDX is the new XML format that allows for over 2 TB partitions.
- If you want the virtual standby export to begin immediately, check the Perform initial on-time export checkbox; otherwise, the export will begin after the next recovery point is received for this agent.
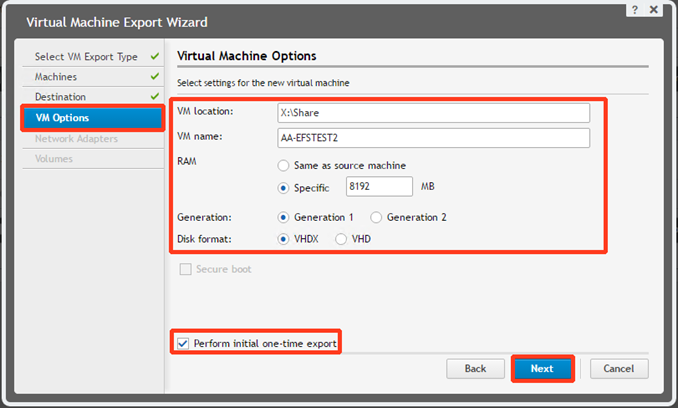
When all settings are complete, click Next to continue.
- Under the Network Adapters tab, select an Available Network from the dropdown menu.
 Note: Please keep in mind that these available networks are for use on a TARGET CORE hosted at Axcient, and not on your SOURCE side.
- Internal-LAN is the most common network choice. This will allow your booted VM to connect out on the internet once your pfSense firewall has been configured for the local LAN.
- Internal-Testing Only allows your VM to be booted without any network connection.
-
WAN-DMZ provides for your VM to be set up using the optional networking available via the pfSense setup.
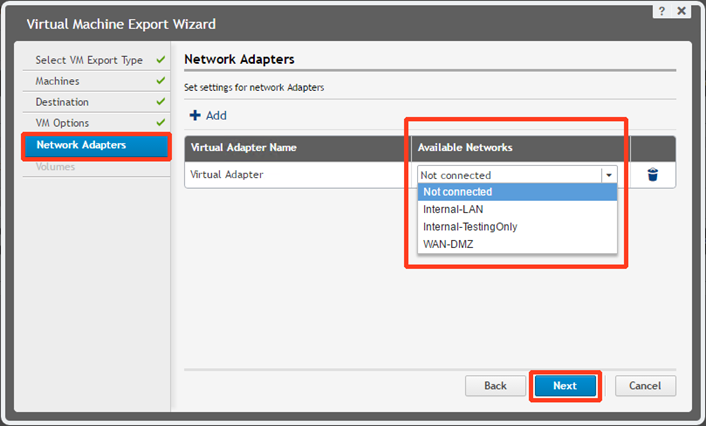
After choosing your desired network, click Next to continue.
- Under the Volumes tab, select the volumes to be exported for the virtual
- All volumes are recommended for the VM to operate properly.
Then click Finish to complete the Virtual Machine Export Wizard.

You can monitor the progress of the virtual standby export jobs in the Events tab in the management console.
Note: For replicated agents on the target Core, the initial replication must fully complete (or the initial seed must be fully consumed) before you can configure virtual standby.
Increasing Your Available Off-site Storage
- To increase the amount of storage available on your hosted target Core, please send a request to Support and include your assigned Core hostname and how much storage you need.
- Storage is always provisioned in blocks that are multiples of 100 GB.
- Usually, additional storage can be added by our engineering team without needing to reboot your target Core server. Our team will notify you when the additional storage has been added; no additional work is required on your part.
- Please note that Axcient bills partners and end-users based on the total amount of storage that has been provisioned for your target Core.
Axcient Continuity Cloud
The Axcient Continuity Cloud is provided to partners and end-users and is billed on a per-use, as-needed basis. To access the Continuity Cloud, send an email to Support to request access.
If your servers are down and you want after-hours access, be sure to follow the instructions in the ticket autoresponder email to escalate the ticket to the highest priority status (CRITICAL).
When you are granted access, you will be given credentials and an IP address that gives you remote desktop access to one or more Continuity Cloud physical nodes. These physical nodes are running Hyper-V and allow you to quickly virtualize your Virtual Standby jobs. You will be assigned public IPs that are pre-routed into a WAN-DMZ network accessible by your Continuity Cloud nodes. You will have access to a virtual router and firewall that will allow you to easily route traffic from the WAN- DMZ to and from a custom virtual LAN.
For detailed instructions on how to use the Axcient Continuity Cloud, please refer to the article entitled AppAssure Continuity Cloud Guide.
Additional Assistance
|
For issues or questions regarding Rapid Recovery v6.x software:
|
|
For Continuity Cloud or to troubleshoot network, replication, or CORE servers:
|
|
Additional information is also available:
|