
Setting Up Virtual Standby Jobs
Virtual standby jobs allow you to keep updated Hyper-V or VMware virtual machines (VMs) that represent the latest version of your protected servers. These VMs are thus ready to be started quickly in case the original protected server is no longer available.
Note: Virtual standby is only available for protected Windows servers at this time (version 5.4.3.106 or newer of AppAssure). All versions prior to v5.4.3.106 have been discontinued and are no longer supported.
- If you are using a BDR appliance locally, we recommend setting up virtual standby jobs on the source Core so the BDR can nearly instantly virtualize your protected servers locally.
- If you are using a dedicated Axcient Continuity Cloud node, you can also set up virtual standby jobs on your hosted target Core. This allows any protected servers to also be virtualized in the cloud nearly instantly.
- If you are not using a dedicated Axcient Continuity Cloud node, you will only set up virtual standby jobs when you have a need to virtualize a server in the cloud, after you have been assigned your on-demand Continuity Cloud node(s).
Virtual standby VMs are updated after each recovery point is received by a Core and thus are kept continuously up to date. Updates to VMs only need to apply the data blocks changed within the received incremental recovery point; thus, updates to VMs usually complete within a few seconds or minutes. The time required for the initial export depends on the amount of data and other factors and might take several hours.
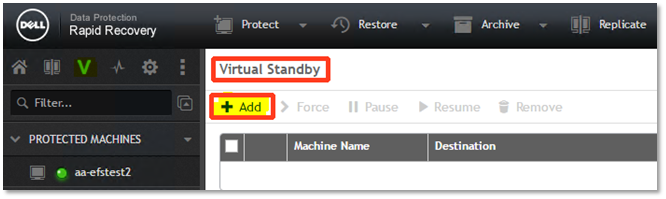
To set up virtual standby jobs on the TARGET SIDE ONLY:
- Log in to the source or target Core Admin Console and navigate to the Virtual Standby Then click Add.
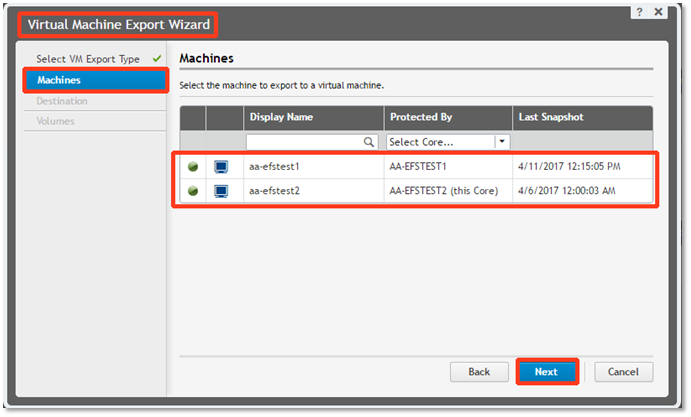
The Virtual Machine Export Wizard dialog appears.
- Under the Machines tab, select the desired agent(s) and then click Next.
- Under the Destination tab, select the target host virtual machine type you want to export the agent to.
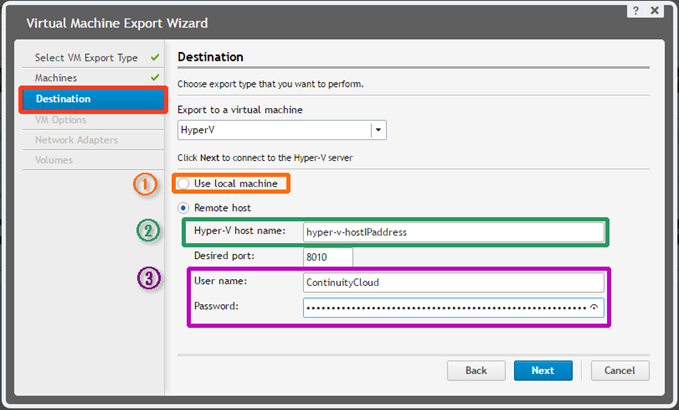
- Note 1: When configuring the Hyper-V export (for Hyper-V-powered BDR appliances), click Use local machine.
- Note 2: When configuring for the Axcient Continuity Cloud: in Hyper-V Host Name, enter the AppAssure private IP listed in the Private- txt file on the desktop of your Continuity Cloud node.
- Note 3: In the User name and Password fields, enter the credentials you were assigned for the Continuity Cloud node.
Then click Next to continue.
- Under the VM Options tab:
- Specify the VM Location: Choose a path that is local to the Hyper-V server (X:\Share). On Axcient Continuity Cloud nodes and Axcient BDR appliances, choose a directory on the “X” volume such as X:\Share.
- Enter the VM Name. Please type in the name of the agent. Spaces are not allowed.
- Choose the amount of RAM to use. (RAM should be set to the size in RAM multiplied by 1024. For instance, if you need 8 GB of RAM, set RAM value to 8 x 1024 = 8192.)
Note: If you leave the RAM set to “Same as source machine”, it will reserve what you have in use on the production machine. If that value is higher than what you have free, the VM will not start (due to lack of RAM) and will need to be changed (in the settings of the VM in question).
- Generation: If you are unaware of which boot partition you have, leave the default setting of Generation 1. Generation 2 is reserved for agents that have an UEFI/EFI boot partition.
- Let the software choose disk format. VHDX is the new XML format that allows for over 2 TB partitions.
- If you want the virtual standby export to begin immediately, check the Perform initial on-time export checkbox; otherwise, the export will begin after the next recovery point is received for this agent.
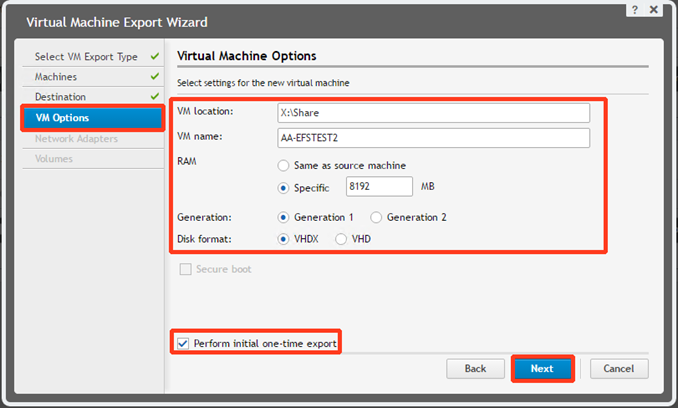
When all settings are complete, click Next to continue.
- Under the Network Adapters tab, select an Available Network from the dropdown menu.
 Note: Please keep in mind that these available networks are for use on a TARGET CORE hosted at Axcient, and not on your SOURCE side.
- Internal-LAN is the most common network choice. This will allow your booted VM to connect out on the internet once your pfSense firewall has been configured for the local LAN.
- Internal-Testing Only allows your VM to be booted without any network connection.
-
WAN-DMZ provides for your VM to be set up using the optional networking available via the pfSense setup.
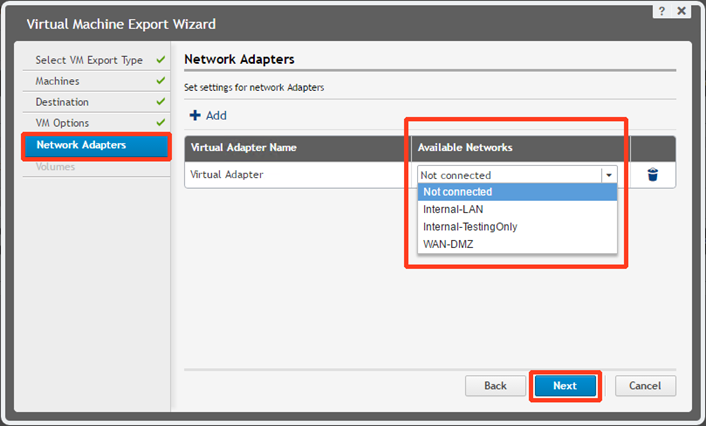
After choosing your desired network, click Next to continue.
- Under the Volumes tab, select the volumes to be exported for the virtual
- All volumes are recommended for the VM to operate properly.
Then click Finish to complete the Virtual Machine Export Wizard.

You can monitor the progress of the virtual standby export jobs in the Events tab in the management console.
Note: For replicated agents on the target Core, the initial replication must fully complete (or the initial seed must be fully consumed) before you can configure virtual standby.
Increasing Your Available Off-site Storage
- To increase the amount of storage available on your hosted target Core, please send a request to https://axcient.com/partner-support/and include your assigned Core host name and how much storage you need.
- Storage is always provisioned in blocks that are multiples of 100 GB.
- Usually, additional storage can be added by our engineering team without needing to reboot your target Core server. Our team will notify you when the additional storage has been added; no additional work is required on your part.
- Please note that Axcient bills partners and end-users based on the total amount of storage that has been provisioned for your target Core.
Axcient Continuity Cloud
The Axcient Continuity Cloud is provided to partners and end-users and is billed on a per-use, as-needed basis. To access the Continuity Cloud, send an email to https://axcient.com/partner-support/ to request access.
If your servers are down and you want after-hours access, be sure to follow the instructions in the ticket autoresponder email to escalate the ticket to the highest priority status (CRITICAL).
When you are granted access, you will be given credentials and an IP address that gives you remote desktop access to one or more Continuity Cloud physical nodes. These physical nodes are running Hyper-V and allow you to quickly virtualize your Virtual Standby jobs. You will be assigned public IPs that are pre-routed into a WAN-DMZ network accessible by your Continuity Cloud nodes. You will have access to a virtual router and firewall that will allow you to easily route traffic from the WAN- DMZ to and from a custom virtual LAN.
For detailed instructions on how to use the Axcient Continuity Cloud, please refer to the Axcient article entitled AppAssure Continuity Cloud Guide.
Additional Assistance
|
For issues or questions regarding Rapid Recovery v6.x software:
|
|
For Axcient Continuity Cloud or to troubleshoot network, replication, or CORE servers:
|
|
Additional information is also available:
|