
The Internet Protocol Security (IPSec) Site to Site VPN feature allows you to establish IPSec VPN tunnels from the Virtual Office in the Axcient Cloud to any standard compliant IKEv2 IPSec VPN gateway on your local network. Specially, you can use this feature during a site disaster to:
- Recreate the network in an organization with two or more sites linked together in a corporate network
- Temporarily replace a connection while a machine room is rebuilt after a disaster
Caution: IPSec Site-to-Site VPN is not recommended in a test environment.
To set up an IPSec Site-to-Site VPN connection, you must turn on the feature in your Virtual Office and also configure settings on your gateway.
Step 1: Configure IPSec Site to Site VPN Settings in the Virtual Office
Subnets section, enter the remote subnets in IPv4 format for sharing with the Virtual Office subnets. Please note that these subnets do not need to intersect with the Virtual Office subnets.
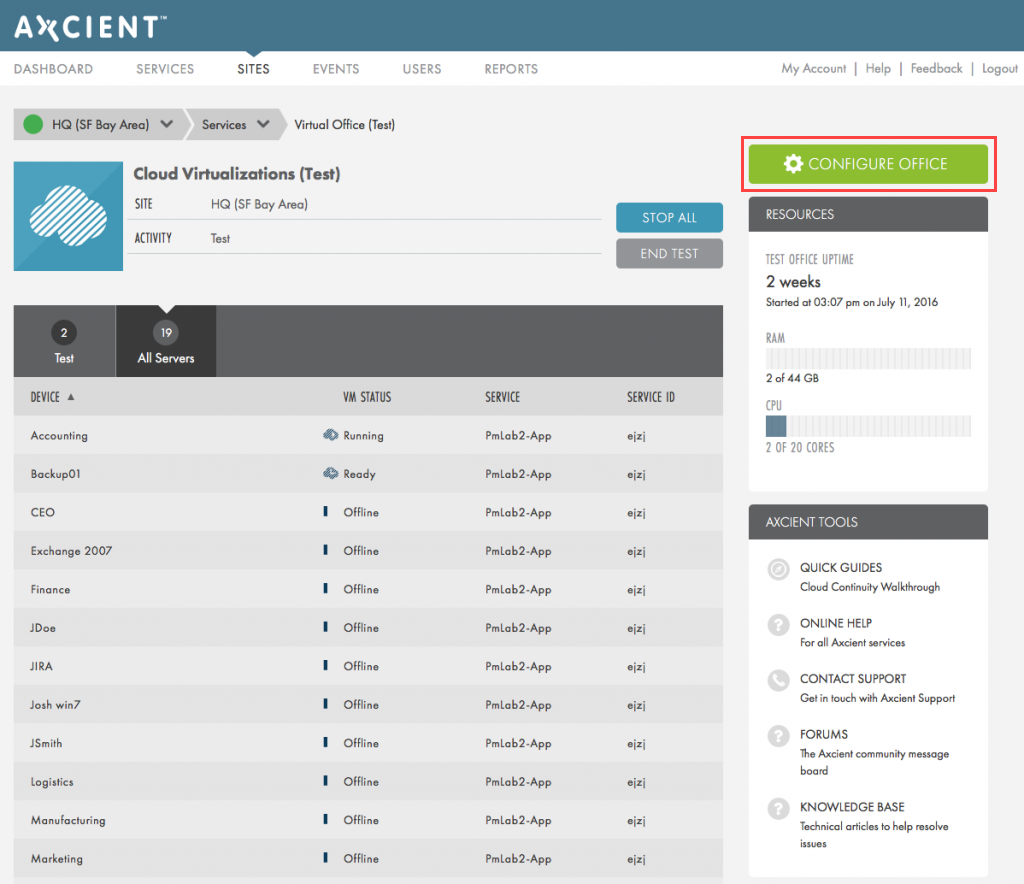
A. With the Virtual Office running, navigate to the Virtual Office page and click the Configure Office button.
The Configure: Virtual Office page displays.
B. On the Configure: Virtual Office page, navigate to the Port Forwarding section and click the Edit button.
Configure Port Forwarding settings as needed.
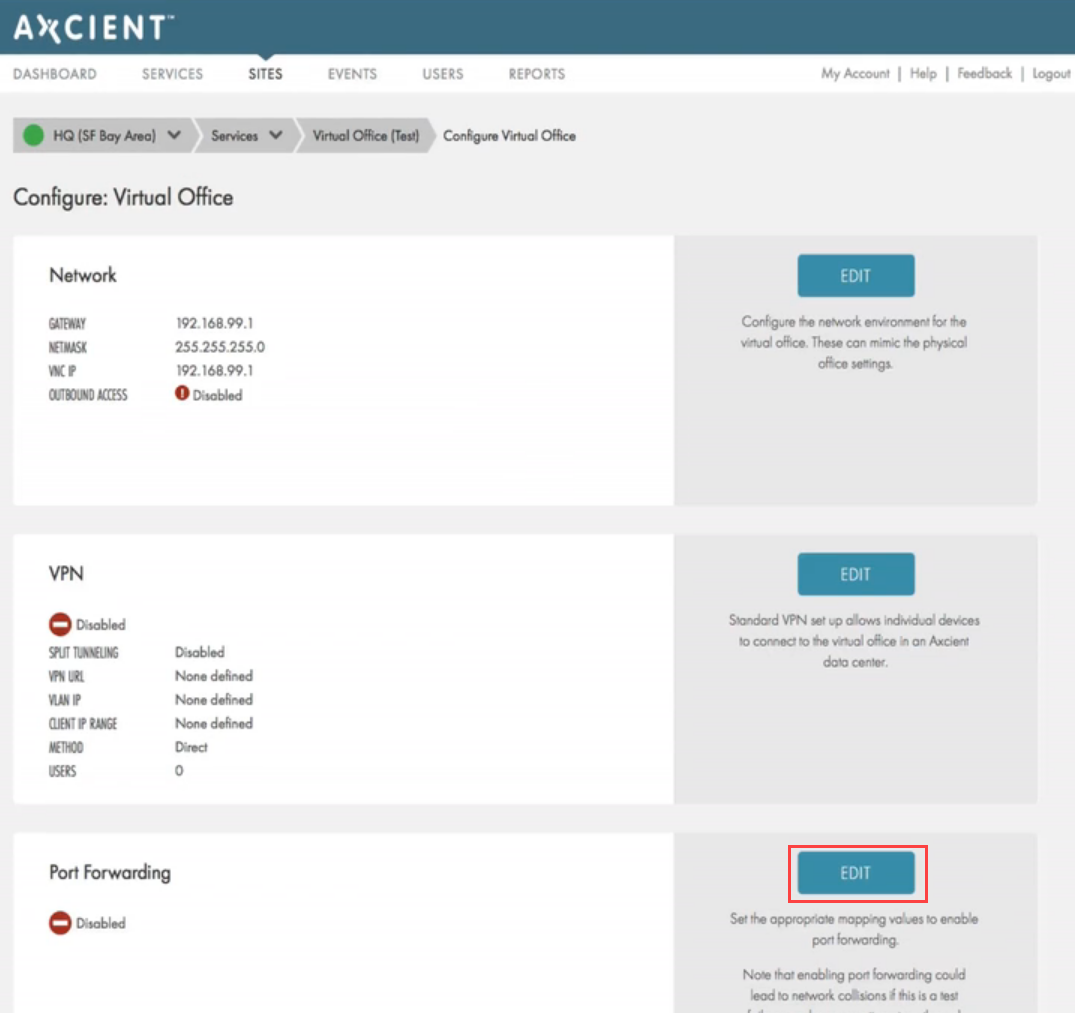
C. After Port Forwarding settings have been configured, navigate to the Site to Site IPSec VPN section and click the Edit button to configure settings. You can configure the following options:
- Click the S2S IPSec option to enable Site to Site IPSec VPN settings.
- In the Site Public IP field, enter the public IP address of the remote machine or hardware with IPSec software (for example, Cisco ASA).
- In the Site Remote Subnets section, enter the remote subnets in IPv4 format for sharing with the Virtual Office subnets. Please note that these subnets do not need to intersect with the Virtual Office subnets.
- In the Local IPSec ID field, specify the IPSec identifier for the virtual office gateway. It can be an IP address (Virtual office public IP) or a distinguished name (FSDN or user FSDN or any unique string)
- In the Remote IPSec ID field, specify the IPSec identifier for the remote site gateway. It can be an IP address (Site public IP) or a distinguished name (FSDN or user FSDN or any unique string)
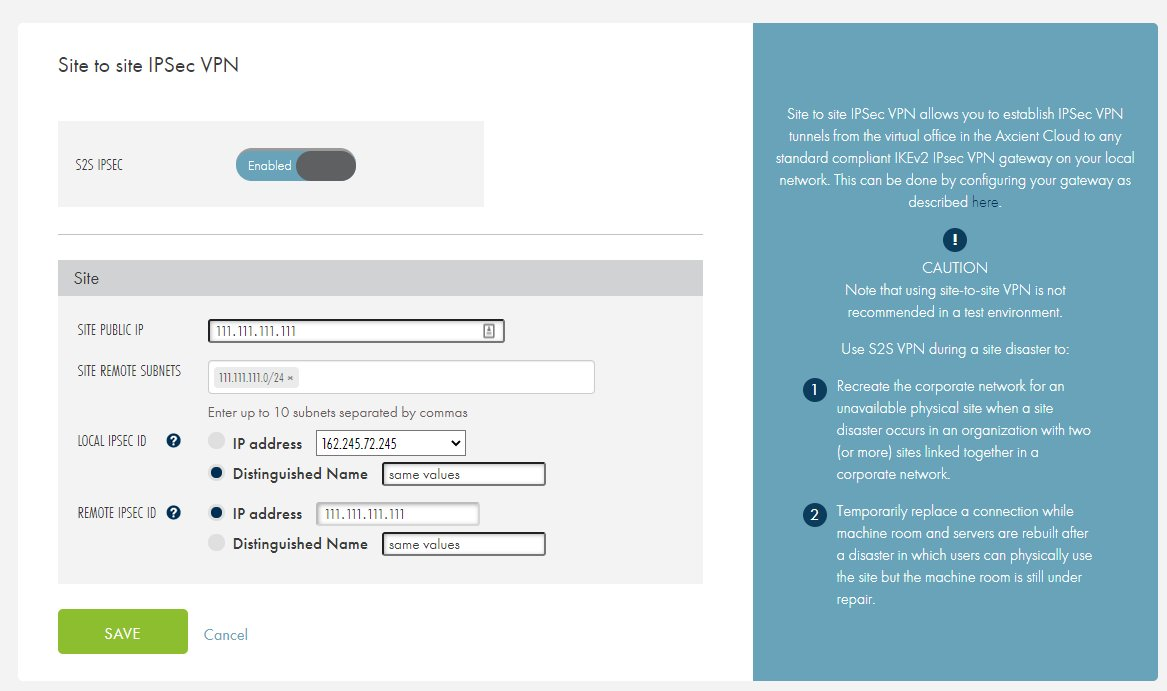
Click the Save button when you are finished.
Step 2: Configure Gateway Settings
You can connect with any standard compliant IKEv2 IPSec VPN gateway.
Example 1: Configure IPSec on Debian Using strongSwan
When you configure IPSec Site to Site VPN settings using strongSwan, we recommend using strongSwan version 5.2.1 or later. Please reference the official strongSwan documentation for more information and additional configuration options.
- Install strongSwan on Debian 8+.
$ sudo apt-get update
$ sudo apt-get install strongswan
- Alternatively, install strongSwan on Debian 7, ensuring
/etc/apt/sources.listcontains following lines:deb http://deb.debian.org/debian wheezy main deb http://deb.debian.org/debian wheezy-backports main
Install strongSwan on Debian 7:
$ sudo apt-get update
$ sudo apt-get install libstrongswan=5.2.1-6+deb8u2~bpo70+1 strongswan-starter=5.2.1-6+deb8u2~bpo70+1 strongswan=5.2.1-6+deb8u2~bpo70+1
- Insert the secret key into the
/etc/ipsec.secretsfile.: PSK <Secret Key>
- Insert settings into the
/etc/ipsec.conffile, where left IP refers to the local IP address where IPSec traffic is listened and right IPrefers to the Virtual Office public IP.conn %default ikelifetime=60m keylife=20m rekeymargin=3m keyingtries=1 keyexchange=ikev2 authby=secret ike=aes256-sha1-modp1536,aes256-sha384-modp1536,aes256-sha256-modp1536,aes256-sha384-modp2048! esp=aes256-sha1-modp1536 mobike=no left=<left IP> leftsubnet=172.20.17.0/24,172.20.19.0/24 leftid=@office leftfirewall=yes auto=start type=tunnel conn 9192aff1-a4ee-4d92-a03a-f63757be083c right=<right IP> rightsubnet=172.18.7.0/24 conn 131c97ba-745b-4e3b-8347-2ef4aea245dd right=<right IP> rightsubnet=172.18.8.0/24 - Enable IP forwarding.
$ sysctl net.ipv4.ip_forward=1
- Apply IPSecsettings.
$ ipsec restart
- Test your configuration settings by trying to access the Virtual Office subnets.
Example 2: Configure IPSec on Cisco ASA
When you configure IPSec Site to Site VPN settings using Cisco ASA, please reference Cisco configuration examples 1 and configuration example 2 for additional information and instructions.
In this example, please note the following:
- 10.16.16.0/24 refers to the the network behind Cisco ASA
- 172.20.32.0/24 refers to the remote network (e.g. inside of Virtual Office)
- 162.22.33.44 refers to the public IP of remote gateway (the Virtual Office gateway)
- port1 refers to the outside port of Cisco ASA
Configuring through Cisco Adaptive Security Device Manager (ASDM)
Step 1– On the Cisco ASDM, configure the encryption algorithms:
|
 |
Step 2– Set the IPSecproposal settings:
|
 |
Step 3 – Launch the Site-to-Site VPN Wizard wizard.
|
 |
| Step 4 – On the Configure: Virtual Office page, scroll to view the Site to Site IPSec VPN section. Record information in the Virtual Office Public IP field and enter this information in Step 2 of the Site-to-Site VPN Connection Setup Wizard. |  |
| Step 5 – Record information in the Virtual Office Subnet field and the Subnet IP field and enter this information in Step 3 of the Site-to-Site VPN Connection Setup Wizard. |  |
| Step 6 – Record information in the Secret Key field and enter this information in Step 4 of the Site-to-Site VPN Connection Setup Wizard. When you are finished, skip Step 5 and click the Finish button. You can now use the Site to Site IPSec VPN feature. |  |
Configuring through Cisco Console
object network local
 subnet 10.16.16.0 255.255.255.0
object network virtual_office
 subnet 172.20.32.0 255.255.255.0

crypto ikev2 policy 1
 encryption aes-256
 integrity sha
 group 5 2
 prf sha
 lifetime seconds 86400
crypto ikev2 policy 2
 encryption aes-256
 integrity sha384
 group 5 2
 prf md5
 lifetime seconds 86400
crypto ikev2 policy 3
 encryption aes-256
 integrity sha256
 group 5 2
 prf md5
 lifetime seconds 86400

crypto ikev2 enable port1

crypto ipsec ikev2 ipsec-proposal aes256-sha256
 protocol esp encryption aes-256
 protocol esp integrity sha-256 sha-1
crypto ipsec ikev2 ipsec-proposal aes256-sha384
 protocol esp encryption aes-256
 protocol esp integrity sha-384 sha-1


crypto map port1_map 1 match address port1_cryptomap
crypto map port1_map 1 set peer 162.22.33.44
crypto map port1_map 1 set ikev2 ipsec-proposal aes256-sha256 aes256-sha384
crypto map port1_map interface port1

access-list port1_cryptomap extended permit ip 10.16.16.0 255.255.255.0 172.20.32.0 255.255.255.0


group-policy GroupPolicy_162.22.33.44 internal
group-policy GroupPolicy_162.22.33.44 attributes
 vpn-tunnel-protocol ikev2


tunnel-group 162.22.33.44 type ipsec-l2l
tunnel-group 162.22.33.44 general-attributes
 default-group-policy GroupPolicy_162.22.33.44
tunnel-group 162.22.33.44 ipsec-attributes
 ikev2 remote-authentication pre-shared-key <Secret key>
 ikev2 local-authentication pre-shared-key <Secret key>
SUPPORT | 720-204-4500 | 800-352-0248
- Contact Axcient Support at https://partner.axcient.com/login or call 800-352-0248
- Free certification courses are available in the Axcient x360Portal under Training
- To learn more about any of our Axcient products, sign up for a free one-on-one training
- Subscribe to the Axcient Status page for a list of status updates and scheduled maintenance